> ## Documentation Index
> Fetch the complete documentation index at: https://blog.clouddley.com/llms.txt
> Use this file to discover all available pages before exploring further.
# How to Deploy a NestJS app on a Scaleway Instance using Clouddley
> Learn how to deploy a NestJS app on a Scaleway Instance using Clouddley.
export const date_0 = "Updated on June 09, 2025"
Taking your [NestJS](https://docs.nestjs.com/) app live is easier than it sounds. With [**Clouddley**](https://clouddley.com) handling deployments and connecting smoothly with Scaleway, you can skip the setup and focus on your code. This tutorial walks you through deploying a NestJS app on a Scaleway Instance, whether it’s for a personal project or production.
## Prerequisites
Before you dive in, make sure you have the following:
* A [Clouddley account](https://clouddley.com/)
* [Scaleway account](https://www.scaleway.com/en/) with billing enabled
* A [GitHub](https://github.com/) or [Bitbucket](https://bitbucket.org/product/) account.
* [Node.js](https://nodejs.org/en/download/current) (version 16 or higher) installed locally
* An [API key](https://www.scaleway.com/en/docs/iam/how-to/create-api-keys/) on Scaleway to manage your instances.
* [Git installed](https://git-scm.com/book/en/v2/Getting-Started-Installing-Git) locally
* Basic familiarity with command line interface
## Set up a New NestJS App
If you don’t already have a NestJS app ready, let’s quickly spin one up.
Open your terminal and run:
```bash theme={null}
npm i -g @nestjs/cli
```
This command will scaffold a new NestJS project in a folder called `my-app`. You’ll be asked to choose a package manager, go with whatever you’re comfortable with (npm or yarn works just fine).
Once it’s done, move into your project directory:
```bash theme={null}
cd my-app
```
Install the necessary dependencies:
```bash theme={null}
npm install
```
You can now run your NestJS app locally to make sure everything is set up correctly:
```bash theme={null}
npm run start
```
Open your browser and go to [http://localhost:3001](http://localhost:3001). You should see “Hello World!”, you're good to go.
Now that you have a basic NestJS app set up, it’s time to prepare it for deployment.
## Push Your Code to GitHub
First, you need to push your NestJS app code to a Git repository.
Go to [GitHub](https://github.com/) and create a new repository. Give it a name and leave the rest of the settings as default (no README, no .gitignore, you already have those locally).
If you haven’t already, initialize a Git repository in your project folder:
```bash theme={null}
git init
```
Add your files and commit:
```bash theme={null}
git add .
git commit -m "Initial commit"
```
Create a branch and link your local repository to the GitHub repository you created:
```bash theme={null}
git branch -M main
git remote add origin
```
Finally, push your code to GitHub:
```bash theme={null}
git push -u origin main
```
Now your NestJS app is pushed to GitHub, let's create a Scaleway instance.
## Create a Scaleway instance using Scaleway CLI
* First, install the Scaleway CLI if you haven’t already done so. It helps you manage Scaleway resources right from your terminal.
```bash theme={null}
curl -sSL https://install.scaleway.dev | bash
```
* Once it’s installed, authenticate by running the command:
```bash theme={null}
scw init
```
You’ll be prompted to enter your access key and secret key. You can [generate](https://www.scaleway.com/en/docs/iam/how-to/create-api-keys/) these from your Scaleway Console under `API Keys`.
* To make sure everything’s working run:
```bash theme={null}
scw instance server list
```
You should see a list of any existing servers or none if this is your first time.
* Configuring security groups is essential for controlling access to your instance. Create a security group that allows HTTP and HTTPS traffic:
```bash theme={null}
scw instance security-group create name=my-sec-group description="Allow port access"
```
This command creates a security group named `Allow port access`.
See the output below:
* Next, add rules to allow inbound traffic on port `3001` and `22`. Run the following commands:
```bash theme={null}
scw instance security-group create-rule \
security-group-id= \
protocol=TCP \
direction=inbound \
action=accept \
ip-range=0.0.0.0/0 \
dest-port-from=3001
```
```bash theme={null}
scw instance security-group create-rule \
security-group-id= \
protocol=TCP \
direction=inbound \
action=accept \
ip-range=0.0.0.0/0 \
dest-port-from=22
```
Replace `` with the ID of the security group you just created. You can find your security group ID by running the command `$ scw instance security-group list` and this will list all security groups.
You see the output below:
* Now, create a new instance:
```bash theme={null}
scw instance server create \
name=app-server \
type=DEV1-S \
image=ubuntu_focal \
zone=fr-par-1 \
ip=new \
security-group=id=
```
Replace `` with the ID of the security group you created earlier.
This command creates a new instance named `app-server` with the `DEV1-S type`, using the `Ubuntu Focal image` in the `fr-par-1` zone. It also assigns a new public IP and applies the security group you created earlier.
You should see output similar to this:
Once your server is ready, get its public IP:
```bash theme={null}
scw instance ip list
```
You should see your new instance listed with its public IP address. Note this down, as you’ll need it later.
## Deploy
Once your NestJS app and your Scaleway instance are ready, it's time to deploy using Clouddley.
* Open your browser, log in to your [Clouddley account](https://app.clouddley.com/auth/signin)
* Click on the Apps in the left sidebar.
* Click on **Deploy App** to begin.
Step 1: Configure your service
* Choose your Git provider: either GitHub or Bitbucket and authorize Clouddley to access your repository. For this tutorial, we’ll use GitHub.
* Click on Continue with GitHub Step 2: Configure Git
* To connect your GitHub user or organization account, click the Select username/organization dropdown and Add GitHub account.
* Once connected, choose the repository and branch that contains your NestJS app.
* Click on Next to proceed.
Step 3: Connect Your Scaleway Instance
* From the **Choose or add server** dropdown, select your VM if it appears in the list. If not, click **+ Add Virtual Machine**.
* To add your VM, enter your Scaleway Instance's IP address as VM host, VM user, and the VM port for SSH access.
* Once you've entered the details, verify the connection using the **Clouddley CLI(recommended)** or **SSH**.
- Open your local machine’s command line, then connect to the remote VM you want to configure with Clouddley. Use this command to SSH into your Scaleway instance:
```bash theme={null}
ssh root@
```
* Install Clouddley CLI by running the command:
```bash theme={null}
curl -L https://raw.githubusercontent.com/clouddley/cli/main/install.sh | sh
```
* To add the SSH public key, run the command:
```bash theme={null}
clouddley add key
```
Using the CLI, you can deploy resources, manage configurations, and automate tasks efficiently.
* Click Verify to confirm the connection, then click Next.
Step 4: Configure app settings
* Now, insert the name of your application and specify the port it runs on.
* Click on **Next**
The firewall of the virtual machine should allow access to the application port.Step 5: Add Environment Variables
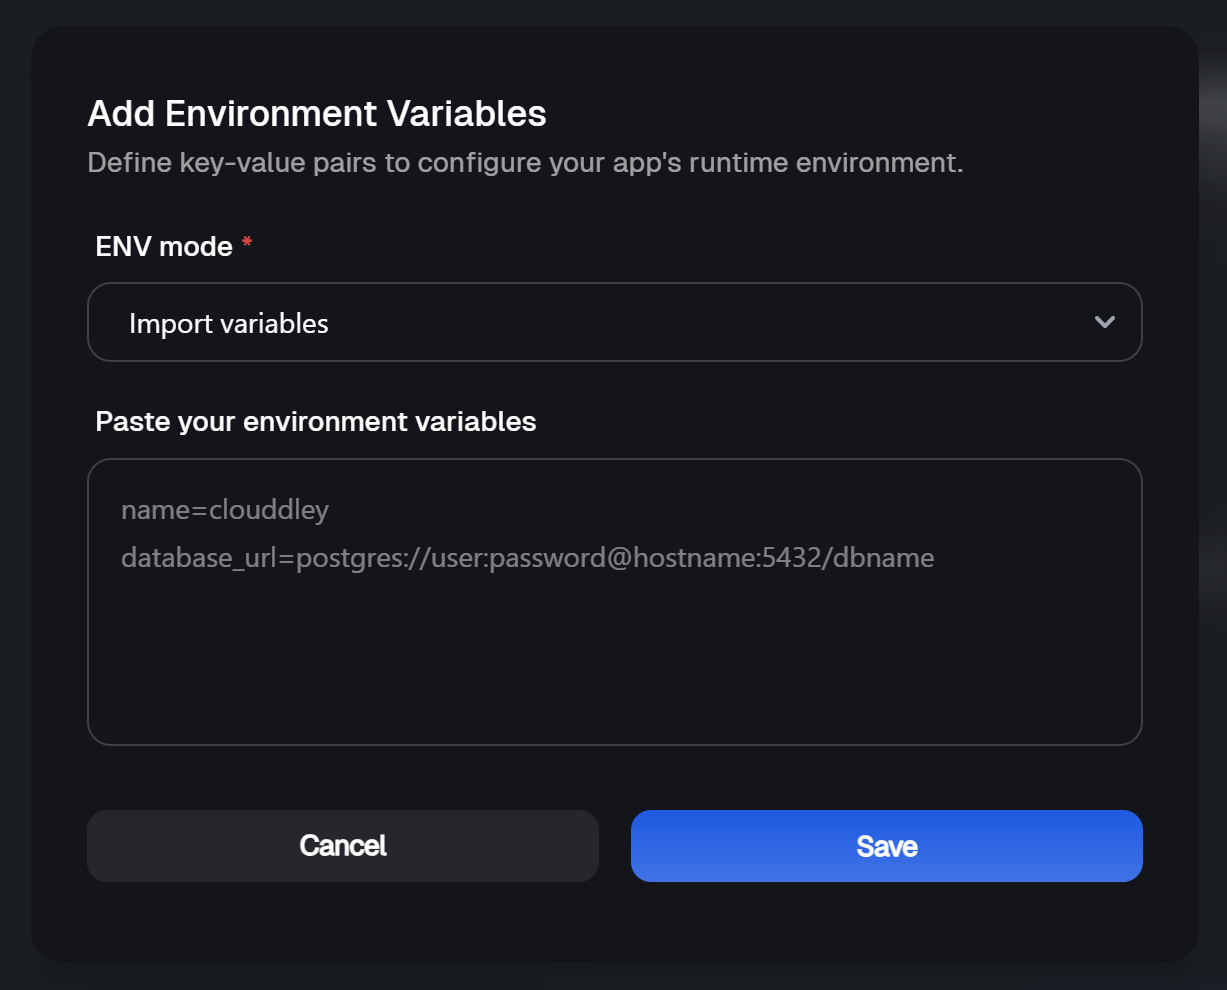
* Click on Add Variable
* Choose an ENV mode: either a single variable or import variables. Learn more [here](https://docs.clouddley.com/apps/extras/environment-variables).
* Add the key-value pairs and click on Save
* Click on Next Step 6: Setup Notifications (optional)
* To configure the notifications settings of the application, click on Add Alert
* Select the Alert type. For this tutorial, we will set up Email notifications.
* Toggle on the buttons for the deployment events (failed, timed out, or success) you want to get notified of.
* Enter your email address (or multiple, if needed).
* Click on Save
* Click on **Deploy**
Step 7: Test and Verify the app
* Click on Go to Dashboard. Your app will be visible on the apps dashboard.
* Once deployment completes, its status will update from `Deploying` to `Online`.
* To test it, click the 🌐 Website button in the top right corner to open your live app in the browser. You should see your NestJS app running on your Scaleway instance.
## After Deployment: Managing Your NestJS App
Once your NestJS app is live on your Scaleway instance, managing it through Clouddley is straightforward. The dashboard gives you all the control you need without having to SSH into your server.\
You can change your deployment settings, [roll back](https://docs.clouddley.com/apps/extras/how-to-rollback-an-application) to a previous version, [scale](https://docs.clouddley.com/apps/extras/scale-applications-on-clouddley) up if traffic grows, and even [pause or resume](https://docs.clouddley.com/apps/extras/how-to-pause-and-resume-applications) your app when needed. Everything’s designed to be simple and quick.
Need to update [environment variables](https://docs.clouddley.com/clouddley-triggr/triggr-apps/extras/environment-variables) or check your logs? That’s all built in too. You’ll also be able to connect a [custom domain](https://docs.clouddley.com/apps/extras/custom-domain) and keep track of your deployment history, right from the same dashboard.
Building with NestJS is already a step in the right direction. It gives you structure, scalability, and a clean development experience. But to get the most out of it, here are a few best practices you’ll want to keep in mind.
Keep your folders organised\
Stick to a modular folder structure. Group your features by domain (like users, auth, products) and keep related files together. This makes your codebase easier to navigate as it grows.
Rely on dependency injection\
NestJS is built around dependency injection, so use it. Avoid tightly coupling your services or hardcoding dependencies. Inject what you need through constructors and let Nest handle the rest.
Use DTOs for data validation\
Data Transfer Objects (DTOs) aren’t just a nice-to-have. They help validate and shape incoming data, keeping your app secure and predictable. Use them with class-validator to enforce rules and avoid nasty surprises.
Keep business logic in services\
Your controllers should be lean. Move all the actual business logic into services so your code stays clean and reusable. Controllers should only handle requests and responses.
Write unit and e2e tests\
NestJS makes testing easy with built-in tools. Take advantage of it. Write unit tests for your services and end-to-end tests for your routes. It helps catch bugs early and gives you confidence when deploying.
Use environment variables\
Avoid hardcoding secrets, ports, or database configs. Use environment variables and load them properly with @nestjs/config. This keeps your app flexible and production-ready.
Handle errors gracefully\
Use filters and exception handling to return meaningful errors. Don’t leave users (or your logs) guessing when something goes wrong.
## Conclusion
And that’s it! You’ve deployed your NestJS app to a Scaleway instance using Clouddley. From setup to deployment, everything stays simple and efficient. This is just the beginning, Clouddley scales with your project and works for other apps too.
Got feedback or ideas to improve the experience? We’d love to hear from you. We can’t wait to see what you deploy next!
A backend infrastructure for your own compute. Run apps, databases, brokers, and AI workloads on your VMs, bare metal, or VPS.
## Resources
* [Clouddley Documentation](https://docs.clouddley.com/)
* [Run Dockerfile on Clouddley](https://docs.clouddley.com/apps/extras/deploy-an-application-with-a-dockerfile-on-clouddley)
* [Scaleway Documentation](https://www.scaleway.com/en/docs/)
* [NestJS Official Documentation](https://docs.nestjs.com/)
* [Scaleway CLI Documentation](https://www.scaleway.com/en/docs/cli/)
* [GitHub Docs](https://docs.github.com/en)
 * Next, add rules to allow inbound traffic on port `3001` and `22`. Run the following commands:
```bash theme={null}
scw instance security-group create-rule \
security-group-id=
* Next, add rules to allow inbound traffic on port `3001` and `22`. Run the following commands:
```bash theme={null}
scw instance security-group create-rule \
security-group-id= * Now, create a new instance:
```bash theme={null}
scw instance server create \
name=app-server \
type=DEV1-S \
image=ubuntu_focal \
zone=fr-par-1 \
ip=new \
security-group=id=
* Now, create a new instance:
```bash theme={null}
scw instance server create \
name=app-server \
type=DEV1-S \
image=ubuntu_focal \
zone=fr-par-1 \
ip=new \
security-group=id= Once your server is ready, get its public IP:
```bash theme={null}
scw instance ip list
```
You should see your new instance listed with its public IP address. Note this down, as you’ll need it later.
## Deploy
Once your NestJS app and your Scaleway instance are ready, it's time to deploy using Clouddley.
* Open your browser, log in to your [Clouddley account](https://app.clouddley.com/auth/signin)
* Click on the Apps in the left sidebar.
* Click on **Deploy App** to begin.
Once your server is ready, get its public IP:
```bash theme={null}
scw instance ip list
```
You should see your new instance listed with its public IP address. Note this down, as you’ll need it later.
## Deploy
Once your NestJS app and your Scaleway instance are ready, it's time to deploy using Clouddley.
* Open your browser, log in to your [Clouddley account](https://app.clouddley.com/auth/signin)
* Click on the Apps in the left sidebar.
* Click on **Deploy App** to begin.




 ## After Deployment: Managing Your NestJS App
Once your NestJS app is live on your Scaleway instance, managing it through Clouddley is straightforward. The dashboard gives you all the control you need without having to SSH into your server.\
You can change your deployment settings, [roll back](https://docs.clouddley.com/apps/extras/how-to-rollback-an-application) to a previous version, [scale](https://docs.clouddley.com/apps/extras/scale-applications-on-clouddley) up if traffic grows, and even [pause or resume](https://docs.clouddley.com/apps/extras/how-to-pause-and-resume-applications) your app when needed. Everything’s designed to be simple and quick.
Need to update [environment variables](https://docs.clouddley.com/clouddley-triggr/triggr-apps/extras/environment-variables) or check your logs? That’s all built in too. You’ll also be able to connect a [custom domain](https://docs.clouddley.com/apps/extras/custom-domain) and keep track of your deployment history, right from the same dashboard.
## After Deployment: Managing Your NestJS App
Once your NestJS app is live on your Scaleway instance, managing it through Clouddley is straightforward. The dashboard gives you all the control you need without having to SSH into your server.\
You can change your deployment settings, [roll back](https://docs.clouddley.com/apps/extras/how-to-rollback-an-application) to a previous version, [scale](https://docs.clouddley.com/apps/extras/scale-applications-on-clouddley) up if traffic grows, and even [pause or resume](https://docs.clouddley.com/apps/extras/how-to-pause-and-resume-applications) your app when needed. Everything’s designed to be simple and quick.
Need to update [environment variables](https://docs.clouddley.com/clouddley-triggr/triggr-apps/extras/environment-variables) or check your logs? That’s all built in too. You’ll also be able to connect a [custom domain](https://docs.clouddley.com/apps/extras/custom-domain) and keep track of your deployment history, right from the same dashboard.