> ## Documentation Index
> Fetch the complete documentation index at: https://blog.clouddley.com/llms.txt
> Use this file to discover all available pages before exploring further.
# How to Deploy MariaDB Database on a DigitalOcean Droplet using Clouddley
> Learn how to deploy MariaDB database on a DigitalOcean Droplet using Clouddley.
export const date_0 = "Updated on July 14, 2025"
[MariaDB](https://mariadb.org/) offers enhanced performance and additional features over traditional MySQL, making it an excellent choice for web applications requiring robust relational database capabilities. With [Clouddley](https://clouddley.com), you can deploy a MariaDB database on DigitalOcean without the typical complexity of manual database setup.
This tutorial shows you how to use Clouddley, a backend infrastructure for compute to get MariaDB running on your Droplet. You'll skip the tedious configuration steps and focus on what matters.
## Prerequisites
Before you begin, ensure you have the following:
* A [Clouddley account](https://clouddley.com/)
* A [DigitalOcean account](https://www.digitalocean.com/)
* [`doctl` (DigitalOcean CLI)](https://docs.digitalocean.com/reference/doctl/how-to/install/) installed and configured
* [DigitalOcean API](https://cloud.digitalocean.com/account/api/tokens) token generated
* Basic knowledge of the command line.
## Create a DigitalOcean Droplet
Let’s create a Droplet using `doctl`, the official CLI for DigitalOcean.
Make sure you've installed doctl, have your DigitalOcean API token ready, added your SSH key to your account, and taken note of your VPC UUID.
* Authenticate with your DigitalOcean account by running the following command in your terminal:
```bash theme={null}
doctl auth init
```
* Enter your API token when prompted. This connects `doctl` to your DigitalOcean account.
Open your terminal and run the command:
```bash theme={null}
doctl compute vpc list
```
This will display all your VPCs along with their UUIDs. Choose the one you want to use for your Droplet.
Open your terminal and run the command:
```bash theme={null}
doctl compute ssh-key list
```
If you do not have a previously created one, follow the steps below.
Step 1: To generate an SSH key, run the command:
```
ssh-keygen -t rsa -b 4096 -C "your_email@example.com"
```
Press Enter to accept the default file location and choose a passphrase if you want one.
Step 2: To add your SSH key to digitalocean, run:
```
doctl compute ssh-key create "my-key-name" --public-key-file ~/.ssh/id_rsa.pub
```
Replace `my-key-name` with a name you’ll recognize.
* Now, let’s create a Droplet by running the following command in your terminal:
```bash theme={null}
doctl compute droplet create db-droplet \
--image ubuntu-24-10-x64 \
--size s-1vcpu-1gb \
--ssh-keys \
--region nyc1 \
--vpc-uuid
```
Replace the placeholders `` and `` with your actual values. The SSH key added here allows Clouddley to securely connect to your Droplet during deployments.
You will see the output below
You've created a droplet named `db-droplet` with `Ubuntu 24.10 x64` image in the `nyc1` region.
* After the Droplet is created, you can check its status by running:
```bash theme={null}
doctl compute droplet list
```
You should see your new Droplet listed with its IP address and status.
Make sure to note the IP address of your Droplet, as you will need it later.
## Deploy
Your Droplet is now ready, you can deploy your MariaDB database using Clouddley.
Step 1: Access Databases
* Log in to your [Clouddley account](https://app.clouddley.com/auth/signin).
* Navigate to the Databases on the left sidebar.
* Click on Deploy Database Step 2: Configure your virtual machine(VM)
* In the **choose or add server** dropdown, select your VM if it's listed. If not, select **+ Add Virtual Machine** and enter your droplet's IP address as the **VM host**, along with the **VM User** and **SSH port**.
* After adding the details, verify the connection with the **Clouddley CLI (recommended)** or **SSH.**
- Open your local machine’s command line, then connect to the remote VM you want to configure with Clouddley. Use this command to SSH into your DigitalOcean Droplet:
```bash theme={null}
ssh root@
```
* Install Clouddley CLI by running the command:
```bash theme={null}
curl -L https://raw.githubusercontent.com/clouddley/cli/main/install.sh | sh
```
* To add the SSH public key, run the command:
```bash theme={null}
clouddley add key
```
Using the CLI, you can deploy resources, manage configurations, and automate tasks efficiently.
* Click on Verify to ensure the connection is successful.
* Once verified, click on Next to proceed.
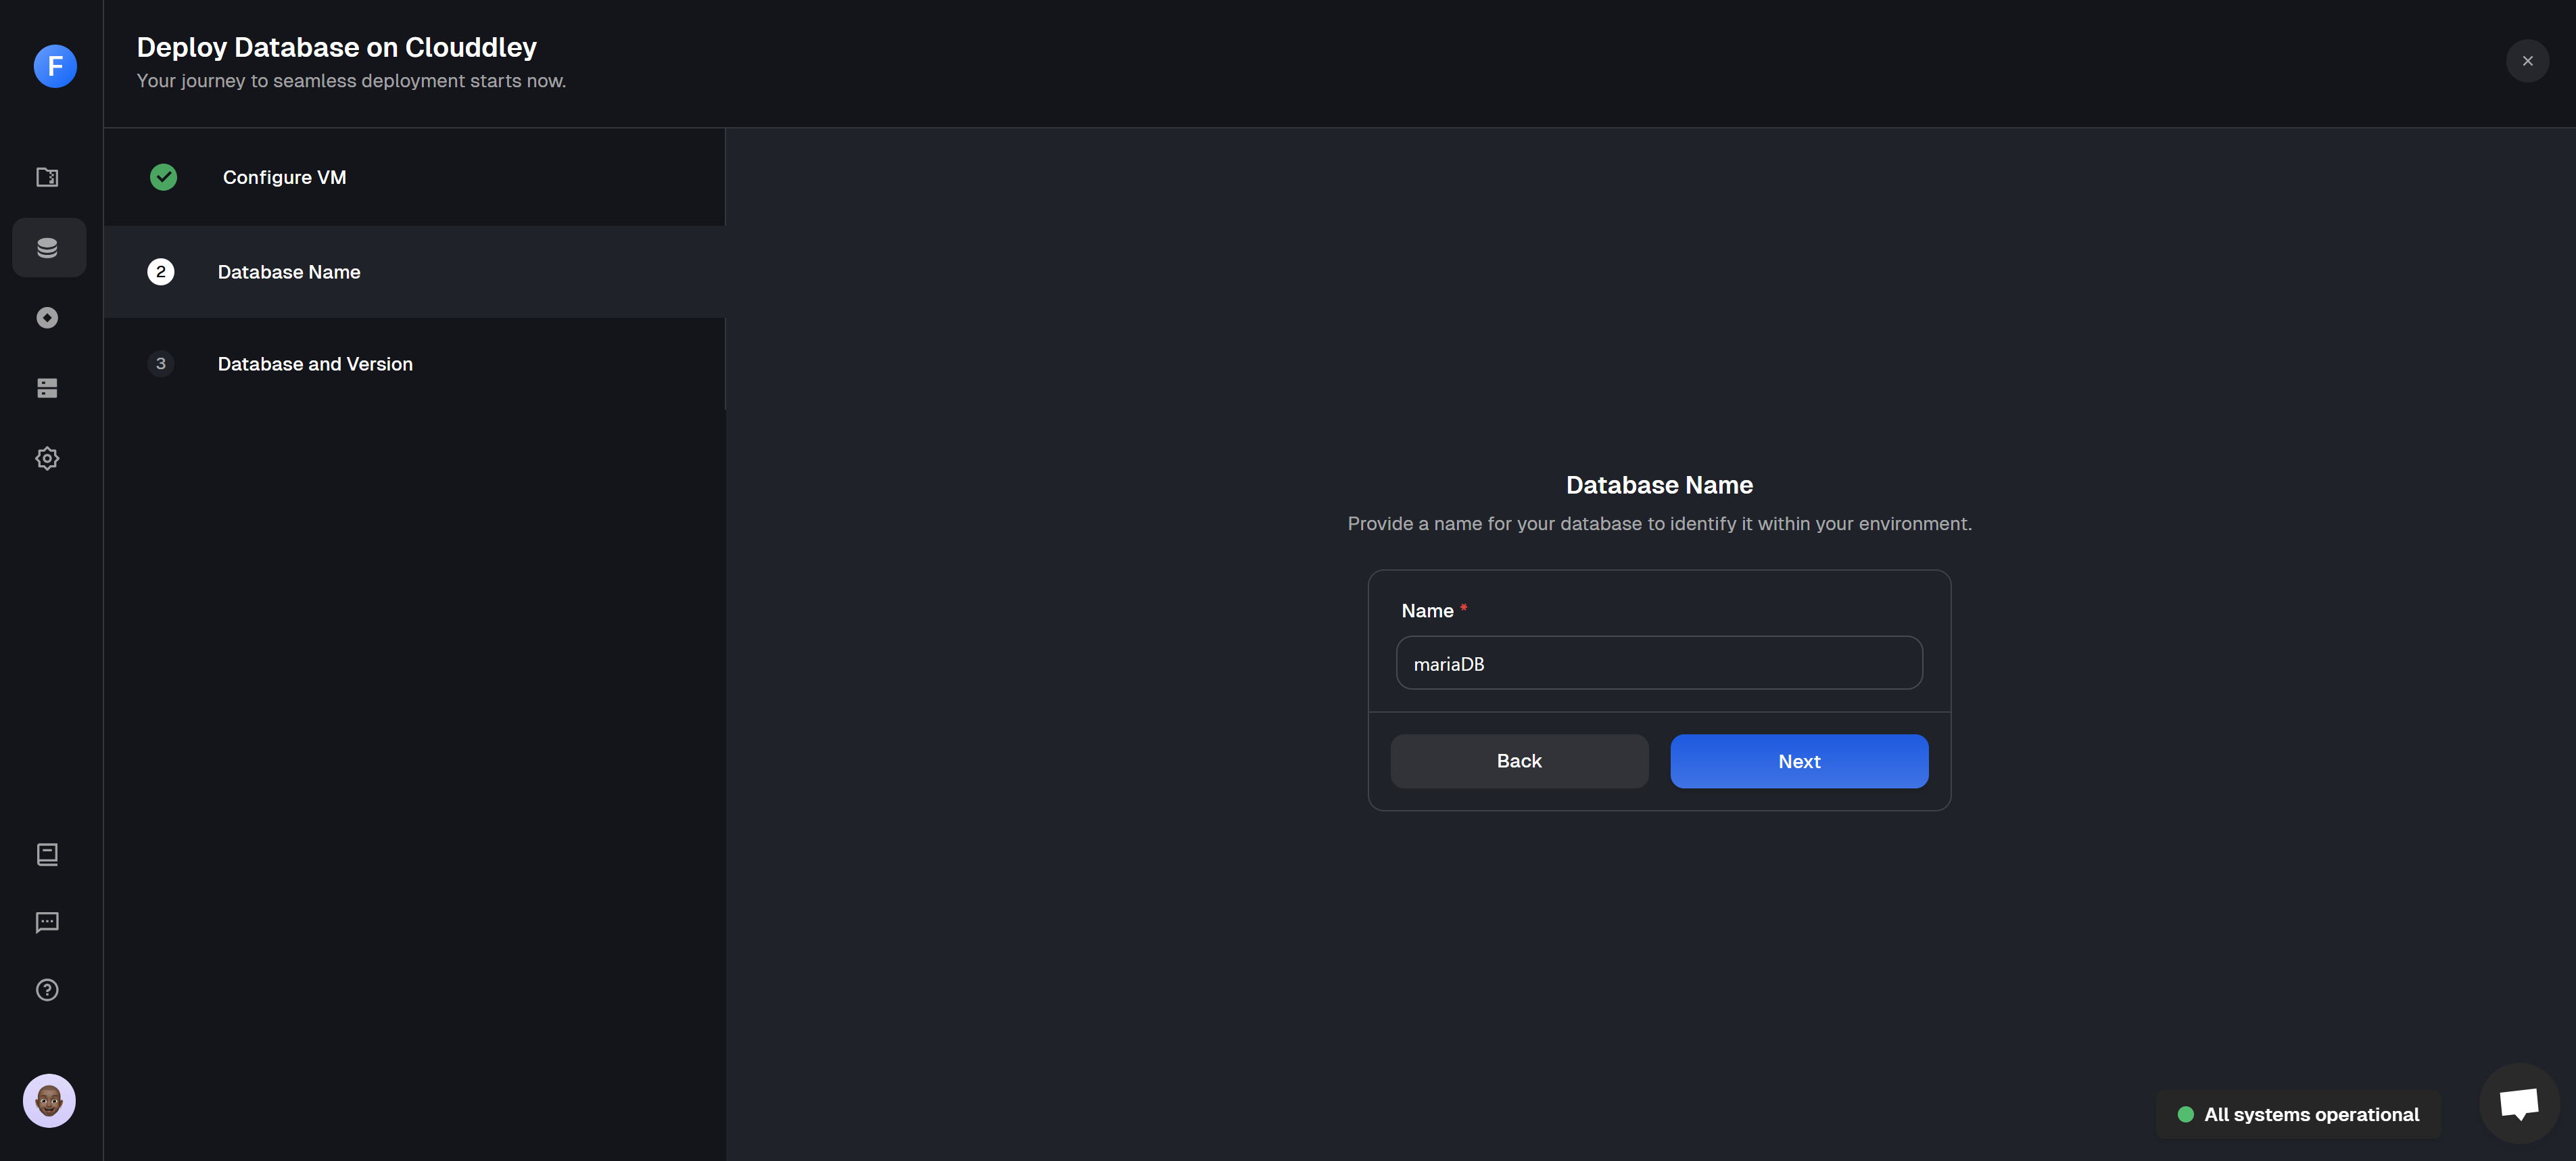
Step 3: Configure your database name
* Input a name for your MariaDB database.
* Click on Next to continue.
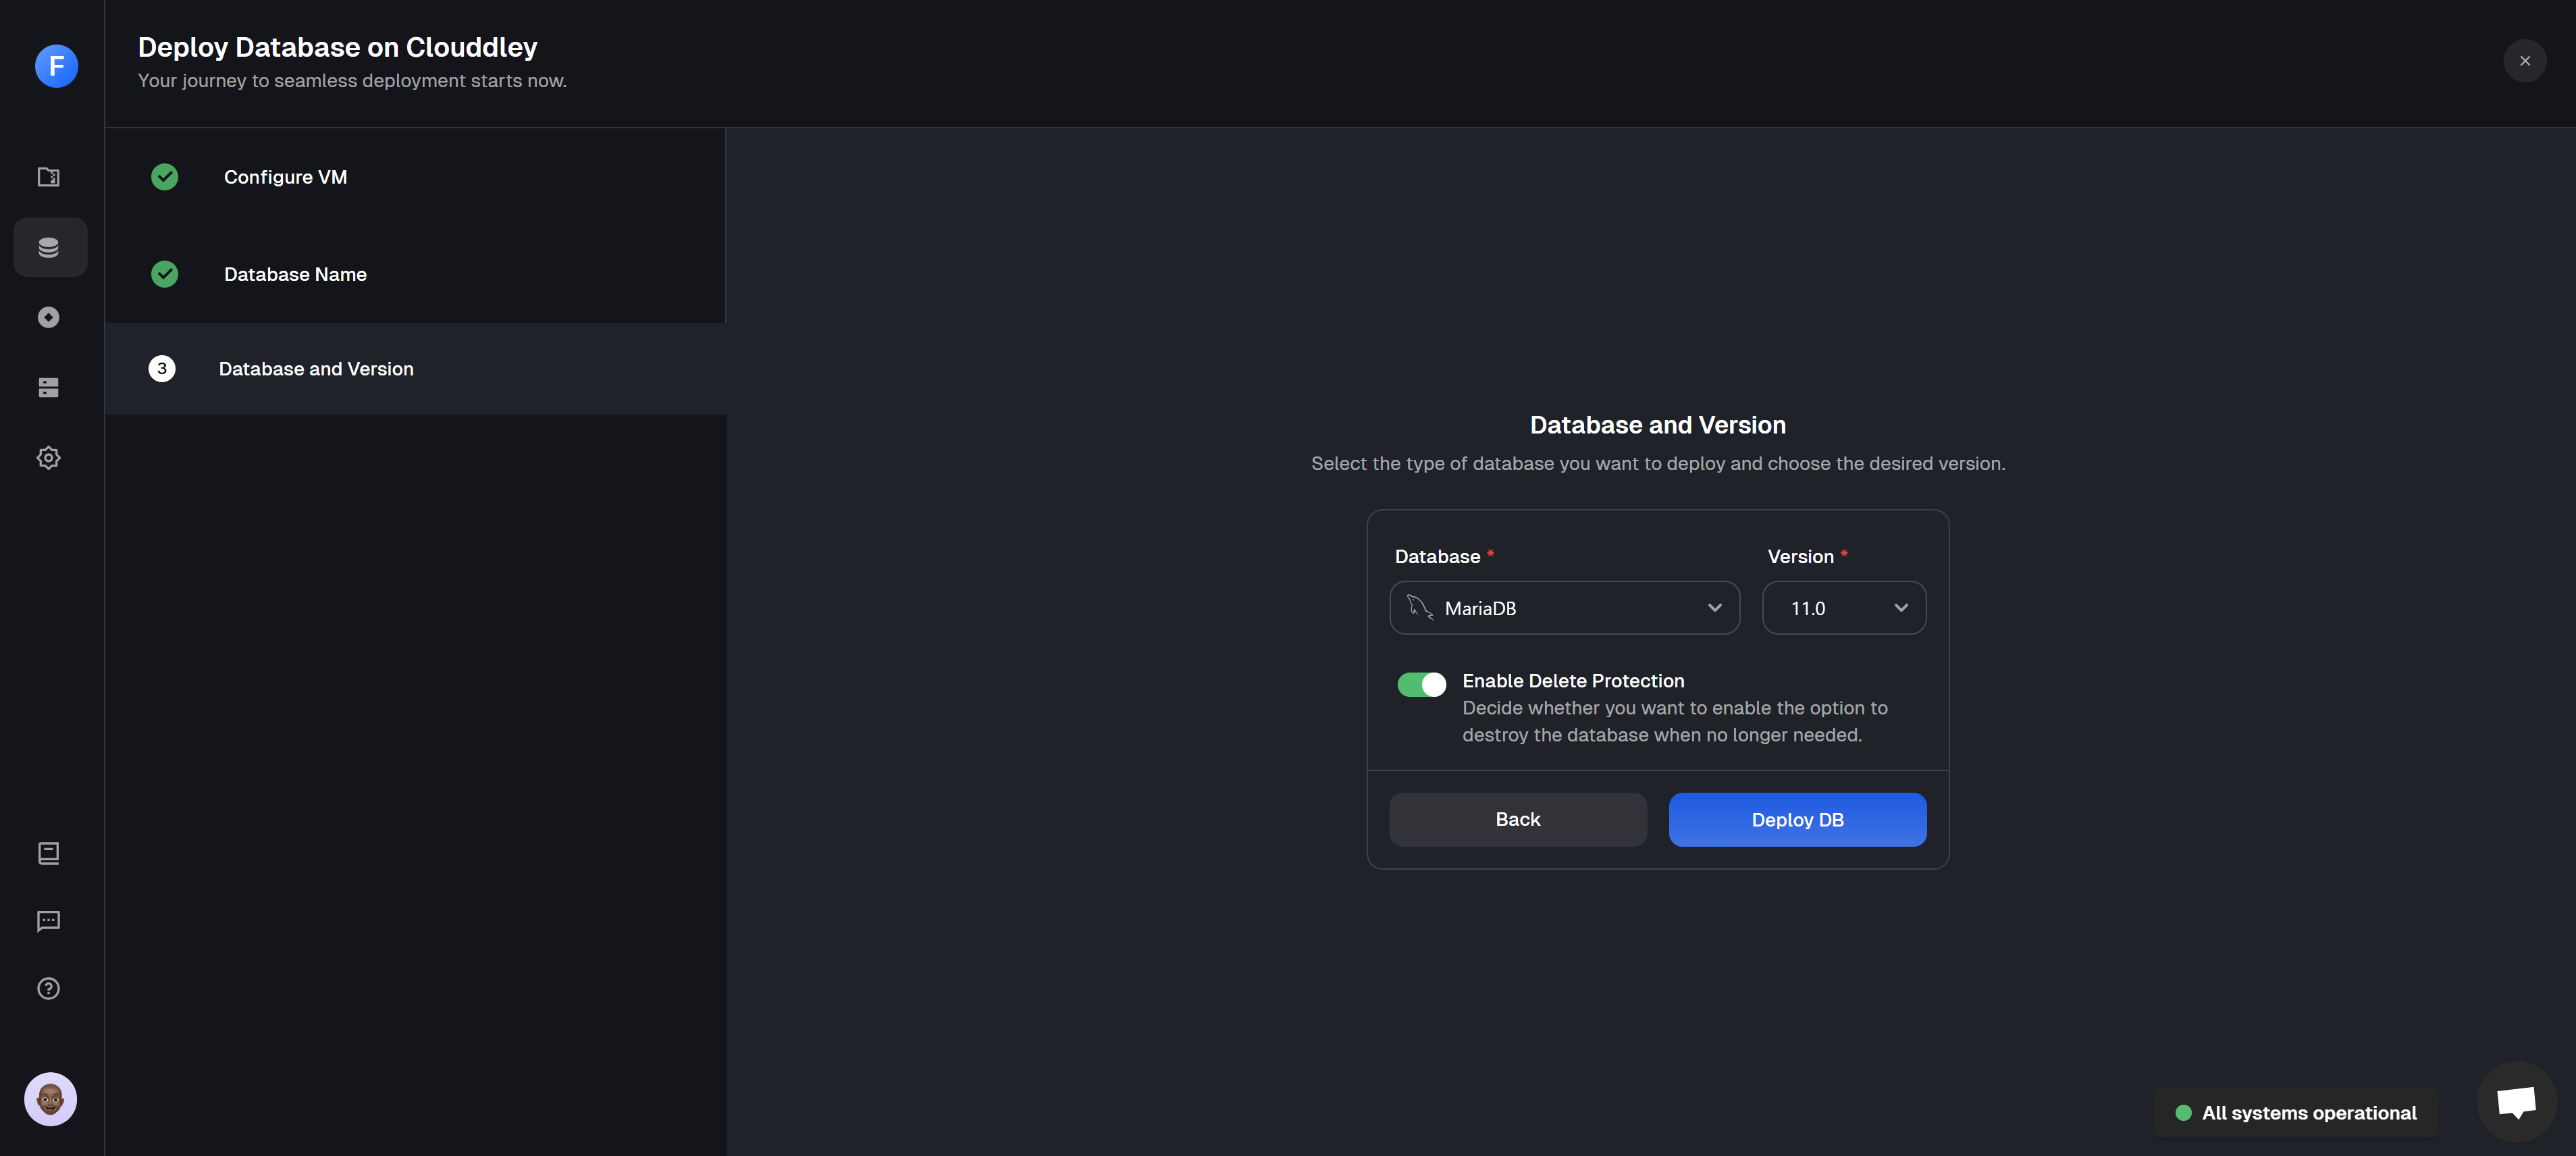
Step 4: Select your database type and version
* Select MariaDB as your database type.
* Choose the version of MariaDB you want to deploy.
Ensure you select a version that is compatible with your application requirements.
* Enable delete protection to prevent accidental deletions.
* Click on Deploy DB Step 5: Validate deployment
* Once your deployment is complete, you will see a confirmation message `Deployed successfully!`
* Your MariaDB database is ready to connect to your application.
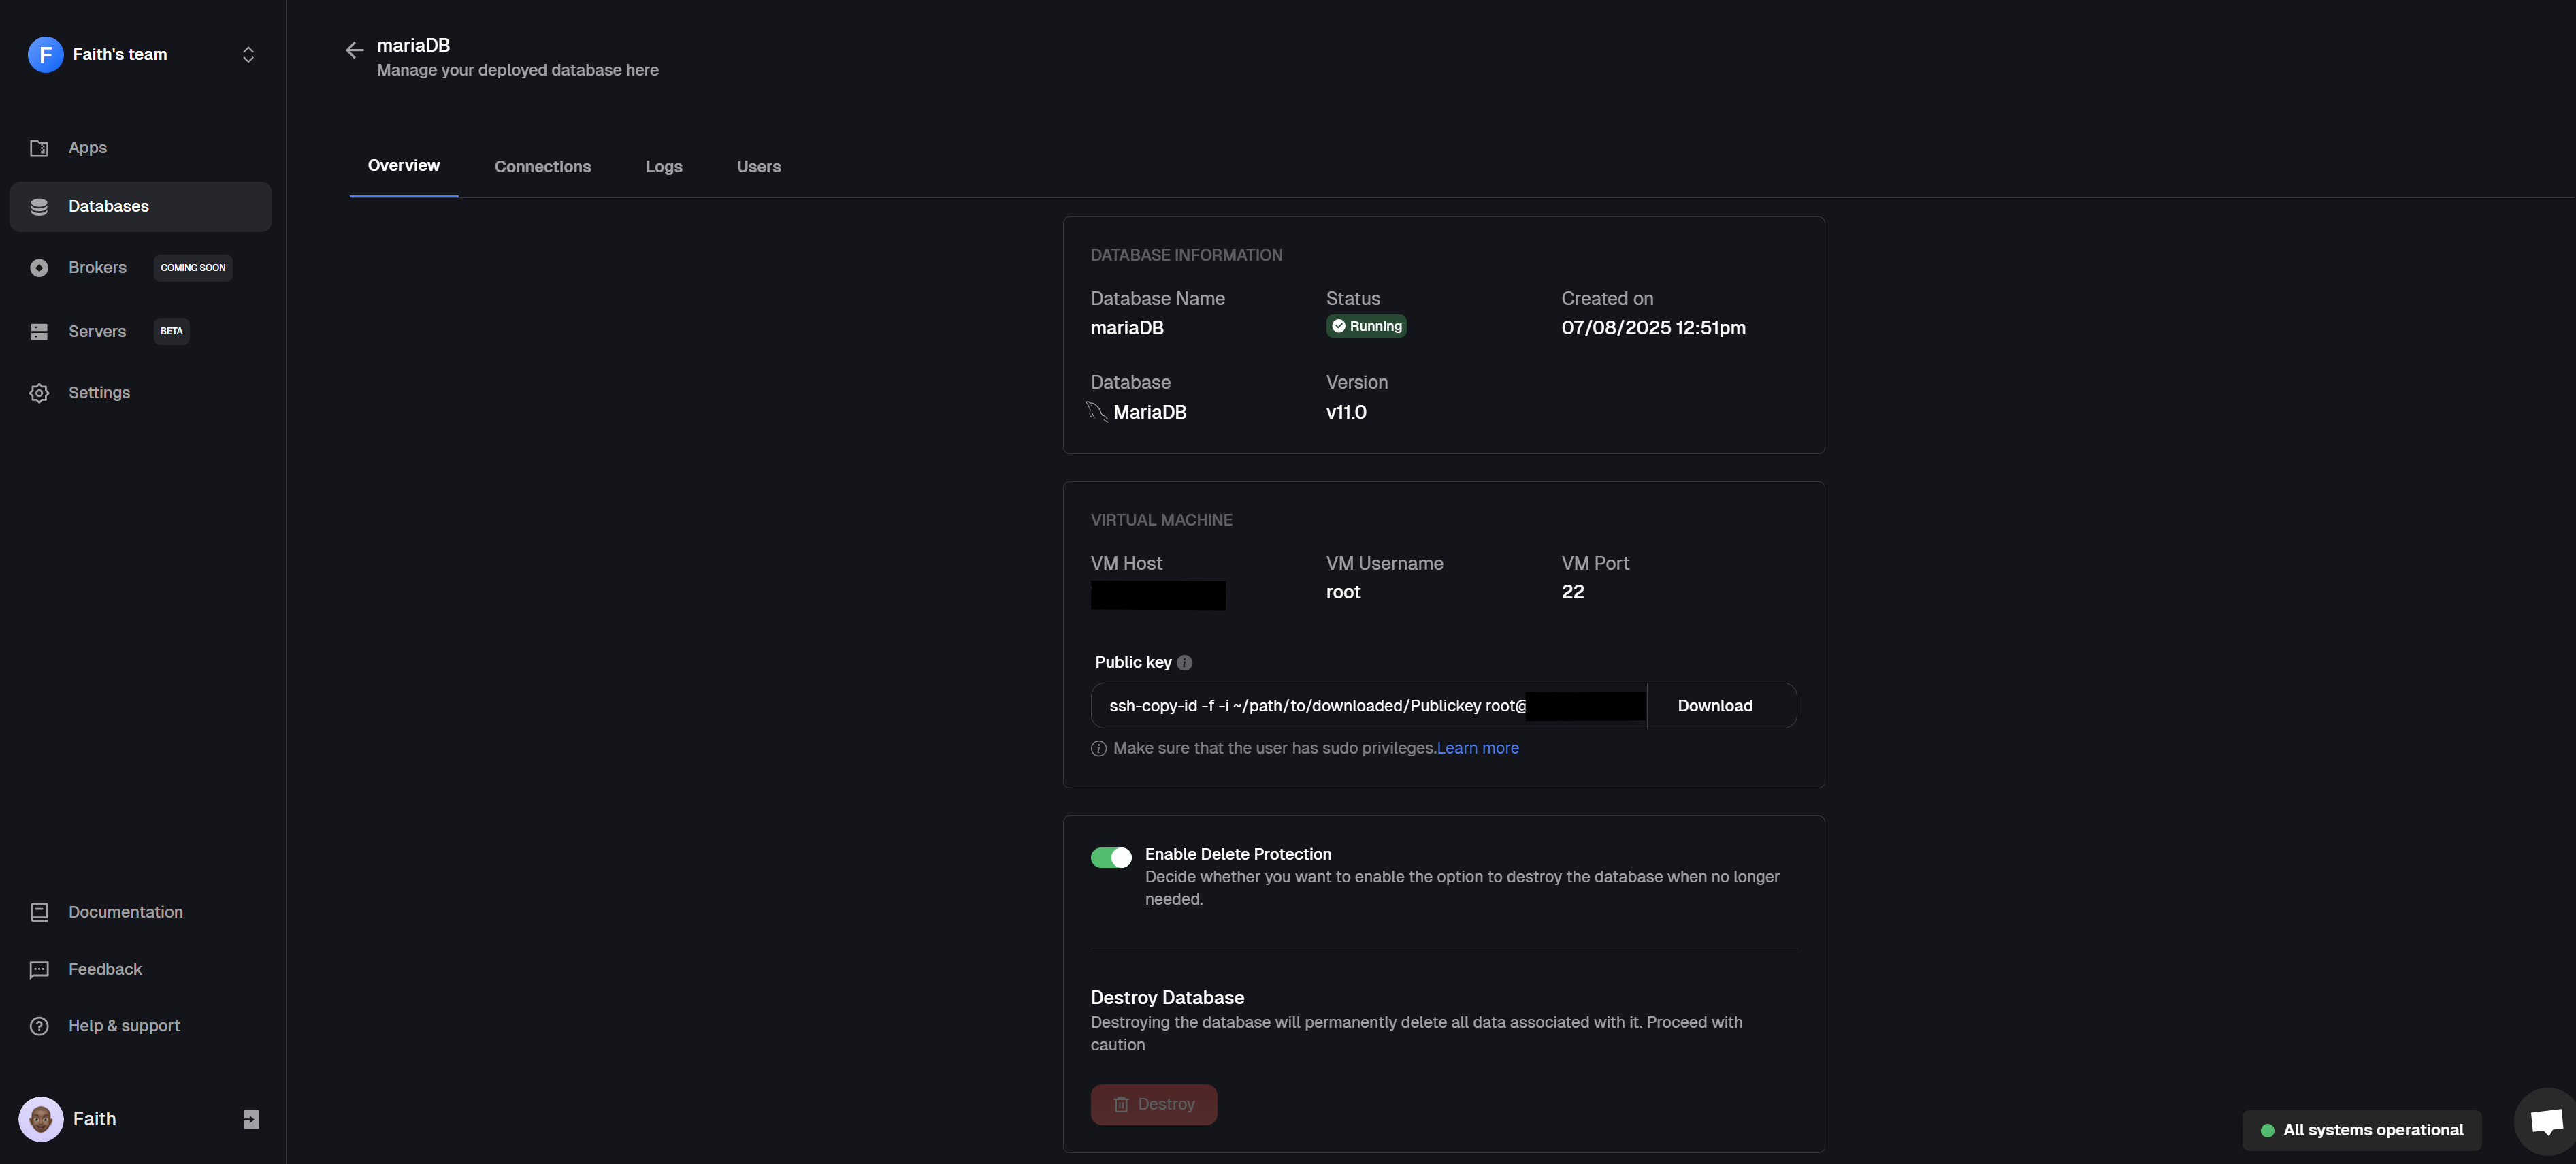
## Manage your database
Managing your MariaDB database on DigitalOcean is simple with the Database dashboard. It gives you everything you need in one place.
Here’s what you can do:
* Monitor your database with real-time logs and quickly spot issues.
* Reset passwords safely with secure authentication and encryption
* Avoid accidental deletions with built-in delete protection.
* Control who can access your database with easy user management.
It’s designed to keep your database secure, organized, and running smoothly.
## Conclusion
You’ve now deployed MariaDB on a DigitalOcean Droplet using Clouddley, no complex configurations and no time-consuming setup. Just a simple, fast, and smooth experience that gets your database ready to go in minutes.
Got feedback or ideas to improve the experience? We’d love to [hear from you](https://clouddley.productlane.com/roadmap). We can’t wait to see what you deploy next!
A backend infrastructure for your own compute. Run apps, databases, brokers, and AI workloads on your VMs, bare metal, or VPS.
## Additional Resources
* [Clouddley Documentation](https://docs.clouddley.com/)
* [MariaDB Documentation](https://mariadb.org/documentation/)
* [DigitalOcean Droplet guides](https://docs.digitalocean.com/products/droplets/)
 You've created a droplet named `db-droplet` with `Ubuntu 24.10 x64` image in the `nyc1` region.
* After the Droplet is created, you can check its status by running:
```bash theme={null}
doctl compute droplet list
```
You should see your new Droplet listed with its IP address and status.
You've created a droplet named `db-droplet` with `Ubuntu 24.10 x64` image in the `nyc1` region.
* After the Droplet is created, you can check its status by running:
```bash theme={null}
doctl compute droplet list
```
You should see your new Droplet listed with its IP address and status.
 Make sure to note the IP address of your Droplet, as you will need it later.
## Deploy
Your Droplet is now ready, you can deploy your MariaDB database using Clouddley.
Step 1: Access Databases
* Log in to your [Clouddley account](https://app.clouddley.com/auth/signin).
* Navigate to the Databases on the left sidebar.
* Click on Deploy Database
Make sure to note the IP address of your Droplet, as you will need it later.
## Deploy
Your Droplet is now ready, you can deploy your MariaDB database using Clouddley.
Step 1: Access Databases
* Log in to your [Clouddley account](https://app.clouddley.com/auth/signin).
* Navigate to the Databases on the left sidebar.
* Click on Deploy Database


 * Your MariaDB database is ready to connect to your application.
## Manage your database
Managing your MariaDB database on DigitalOcean is simple with the Database dashboard. It gives you everything you need in one place.
Here’s what you can do:
* Monitor your database with real-time logs and quickly spot issues.
* Reset passwords safely with secure authentication and encryption
* Avoid accidental deletions with built-in delete protection.
* Control who can access your database with easy user management.
* Your MariaDB database is ready to connect to your application.
## Manage your database
Managing your MariaDB database on DigitalOcean is simple with the Database dashboard. It gives you everything you need in one place.
Here’s what you can do:
* Monitor your database with real-time logs and quickly spot issues.
* Reset passwords safely with secure authentication and encryption
* Avoid accidental deletions with built-in delete protection.
* Control who can access your database with easy user management.
 It’s designed to keep your database secure, organized, and running smoothly.
## Conclusion
You’ve now deployed MariaDB on a DigitalOcean Droplet using Clouddley, no complex configurations and no time-consuming setup. Just a simple, fast, and smooth experience that gets your database ready to go in minutes.
Got feedback or ideas to improve the experience? We’d love to [hear from you](https://clouddley.productlane.com/roadmap). We can’t wait to see what you deploy next!
It’s designed to keep your database secure, organized, and running smoothly.
## Conclusion
You’ve now deployed MariaDB on a DigitalOcean Droplet using Clouddley, no complex configurations and no time-consuming setup. Just a simple, fast, and smooth experience that gets your database ready to go in minutes.
Got feedback or ideas to improve the experience? We’d love to [hear from you](https://clouddley.productlane.com/roadmap). We can’t wait to see what you deploy next!