> ## Documentation Index
> Fetch the complete documentation index at: https://blog.clouddley.com/llms.txt
> Use this file to discover all available pages before exploring further.
# How to Deploy a Flask App on a DigitalOcean Droplet using Clouddley
> Learn how to deploy a Flask App on a DigitalOcean Droplet using Clouddley.
export const date_0 = "Updated on May 20, 2025"
Deploying a [Flask](https://flask.palletsprojects.com/en/stable/) app to a virtual machine can feel overwhelming, but [**Clouddley**](https://clouddley.com/) makes it simple. It automates deployments, connects smoothly with DigitalOcean, and handles the setup for you. In this tutorial, you’ll learn how to deploy your Flask app to a DigitalOcean Droplet with ease.
## Prerequisites
Before we dive in, make sure you have the following ready:
* A [Clouddley account](https://clouddley.com/)
* A [DigitalOcean account](https://www.digitalocean.com/)
* A [GitHub](https://github.com/) or [Bitbucket](https://bitbucket.org/product/) account
* [`doctl` (DigitalOcean CLI)](https://docs.digitalocean.com/reference/doctl/how-to/install/) installed and configured
* [DigitalOcean API](https://cloud.digitalocean.com/account/api/tokens) token generated
* [Python](https://www.python.org/downloads/) installed locally
* [pip](https://pip.pypa.io/en/stable/installation/) installed
* [Git installed](https://git-scm.com/book/en/v2/Getting-Started-Installing-Git) locally
* Basic familiarity with the Linux command line
## Create a Flask Application
Before you deploy your Flask app, it's a good idea to make sure everything runs smoothly on your local machine. Let’s walk through how to set up and test the simple Flask application step by step.
In your terminal, run:
```bash theme={null}
mkdir flask-app
cd flask-app
```
Open the command line and run:
* For Windows:
```bash theme={null}
# Create virtual environment
python -m venv venv
# Activate the environment
venv\Scripts\activate
```
* For Linux/MacOS:
```bash theme={null}
# Create virtual environment
python3 -m venv venv
# Activate the environment
source venv/bin/activate
```
Creating a virtual environment helps keep your project’s dependencies isolated, so they don’t conflict with other Python projects on your machine.
```bash theme={null}
pip install flask
```
Create a file named `app.py` and add the following code:
```python theme={null}
from flask import Flask
app = Flask(__name__)
@app.route("/")
def hello():
return "Hello, World!"
if __name__ == "__main__":
app.run(host="0.0.0.0", port=3070)
```
With the server up and running, open your browser and head to:
[http://localhost:3070](http://localhost:3070)
You should see **"Hello, World!"** on the screen, that means your Flask app is working perfectly!
## Push Your Flask App to GitHub
Once your Flask app is running locally, the next step is to track it with Git and push it to a remote repository like GitHub or Bitbucket. This helps you manage changes over time and is also key for deploying with Clouddley.
In this tutorial, we’ll use GitHub. Let’s walk through the steps:
Go to [GitHub](https://github.com/) and create a new repository. Give it a name and leave the rest of the settings as default (no README, no .gitignore, you already have those locally).
If you haven’t already, initialize a Git repository in your project folder:
```bash theme={null}
git init
```
Add your files and commit:
```bash theme={null}
git add .
git commit -m "Initial commit"
```
Create a branch and link your local repository to the GitHub repository you created:
```bash theme={null}
git branch -M main
git remote add origin
```
Finally, push your code to GitHub:
```bash theme={null}
git push -u origin main
```
Now your code is pushed to GitHub, it is ready for deployment.
## Launch a DigitalOcean Droplet
Next, we’ll spin up a Droplet right from the command line using the `doctl` CLI.
Before you begin, ensure you have your DigitalOcean API token ready.
* Authenticate with your DigitalOcean account, run the following command in your terminal:
```bash theme={null}
doctl auth init
```
* Enter your API token when prompted. This will allow doctl to interact with your DigitalOcean account.
* Before creating your Droplet, make sure you have your `vpc_uuid` and `SSH key` added to your DigitalOcean account.
Open your terminal and run the command:
```bash theme={null}
doctl compute vpc list
```
This will display all your VPCs along with their UUIDs. Choose the one you want to use for your Droplet.
Open your terminal and run the command:
```bash theme={null}
doctl compute ssh-key list
```
If you do not have a previously created one, follow the steps below.
Step 1: To generate an SSH key, run the command:
```
ssh-keygen -t rsa -b 4096 -C "your_email@example.com"
```
Press Enter to accept the default file location and choose a passphrase if you want one.
Step 2: To add your SSH key to digitalocean, run:
```
doctl compute ssh-key create "my-key-name" --public-key-file ~/.ssh/id_rsa.pub
```
Replace `my-key-name` with a name you’ll recognize.
* Now, let’s create a Droplet by running the following command in your terminal:
```bash theme={null}
doctl compute droplet create app-droplet \
--image ubuntu-24-10-x64 \
--size s-1vcpu-1gb \
--ssh-keys your_ssh_key_id \
--region nyc1 \
--vpc-uuid your_vpc_uuid
```
Be sure to replace `your_vpc_uuid` and `your_ssh_key_id` with your actual values. The SSH key you add here lets Clouddley securely connect to your Droplet during deployments. It uses this key to access the VM, run deployment scripts, and manage your app with no passwords required.
You will see the output below
You’ve successfully created a Droplet named `app-droplet` using the `Ubuntu 24.10 x64` image, located in the `nyc1` region.
* To confirm that your Droplet was created successfully, run the command:
```bash theme={null}
doctl compute droplet list
```
This will display all your active Droplets, along with their names, IPs, and statuses.
Make sure to note the **public IP address** for SSH access.
## Deploy
Your Flask app and DigitalOcean Droplet are ready, now you can deploy your app.
* Open your browser and log in to your [Clouddley account](https://app.clouddley.com/auth/signin)
* Navigate to **Apps** and click on Deploy App Step 1: Configure Service
* Choose your Git hosting service; either GitHub or Bitbucket. For this tutorial, we will be using GitHub.
* Click on Continue with GitHub Step 2: Configure Git
* To connect your GitHub user or organization account, click the Select username/organization dropdown and Add GitHub account.
* Once connected, Select your repository and the branch from the dropdown list or quickly search.
* Click on Next Step 3: Configure your Virtual Machine
* From the **Choose or add server** dropdown, select your VM if it appears in the list. If not, click **+ Add Virtual Machine**.
* To add your VM, enter your droplet's IP address as VM host, VM user, and the VM port for SSH access.
* Once you've entered the details, verify the connection using the **Clouddley CLI(recommended)** or **SSH**.
- Open your local machine’s command line, then connect to the remote VM you want to configure with Clouddley. Use this command to SSH into your DigitalOcean Droplet:
```bash theme={null}
ssh root@
```
* Install Clouddley CLI by running the command:
```bash theme={null}
curl -L https://raw.githubusercontent.com/clouddley/cli/main/install.sh | sh
```
* To add the SSH public key, run the command:
```bash theme={null}
clouddley add key
```
Using the CLI, you can deploy resources, manage configurations, and automate tasks efficiently.
* Click Verify to test the connection to your VM.
* Once it’s verified, click on Next.
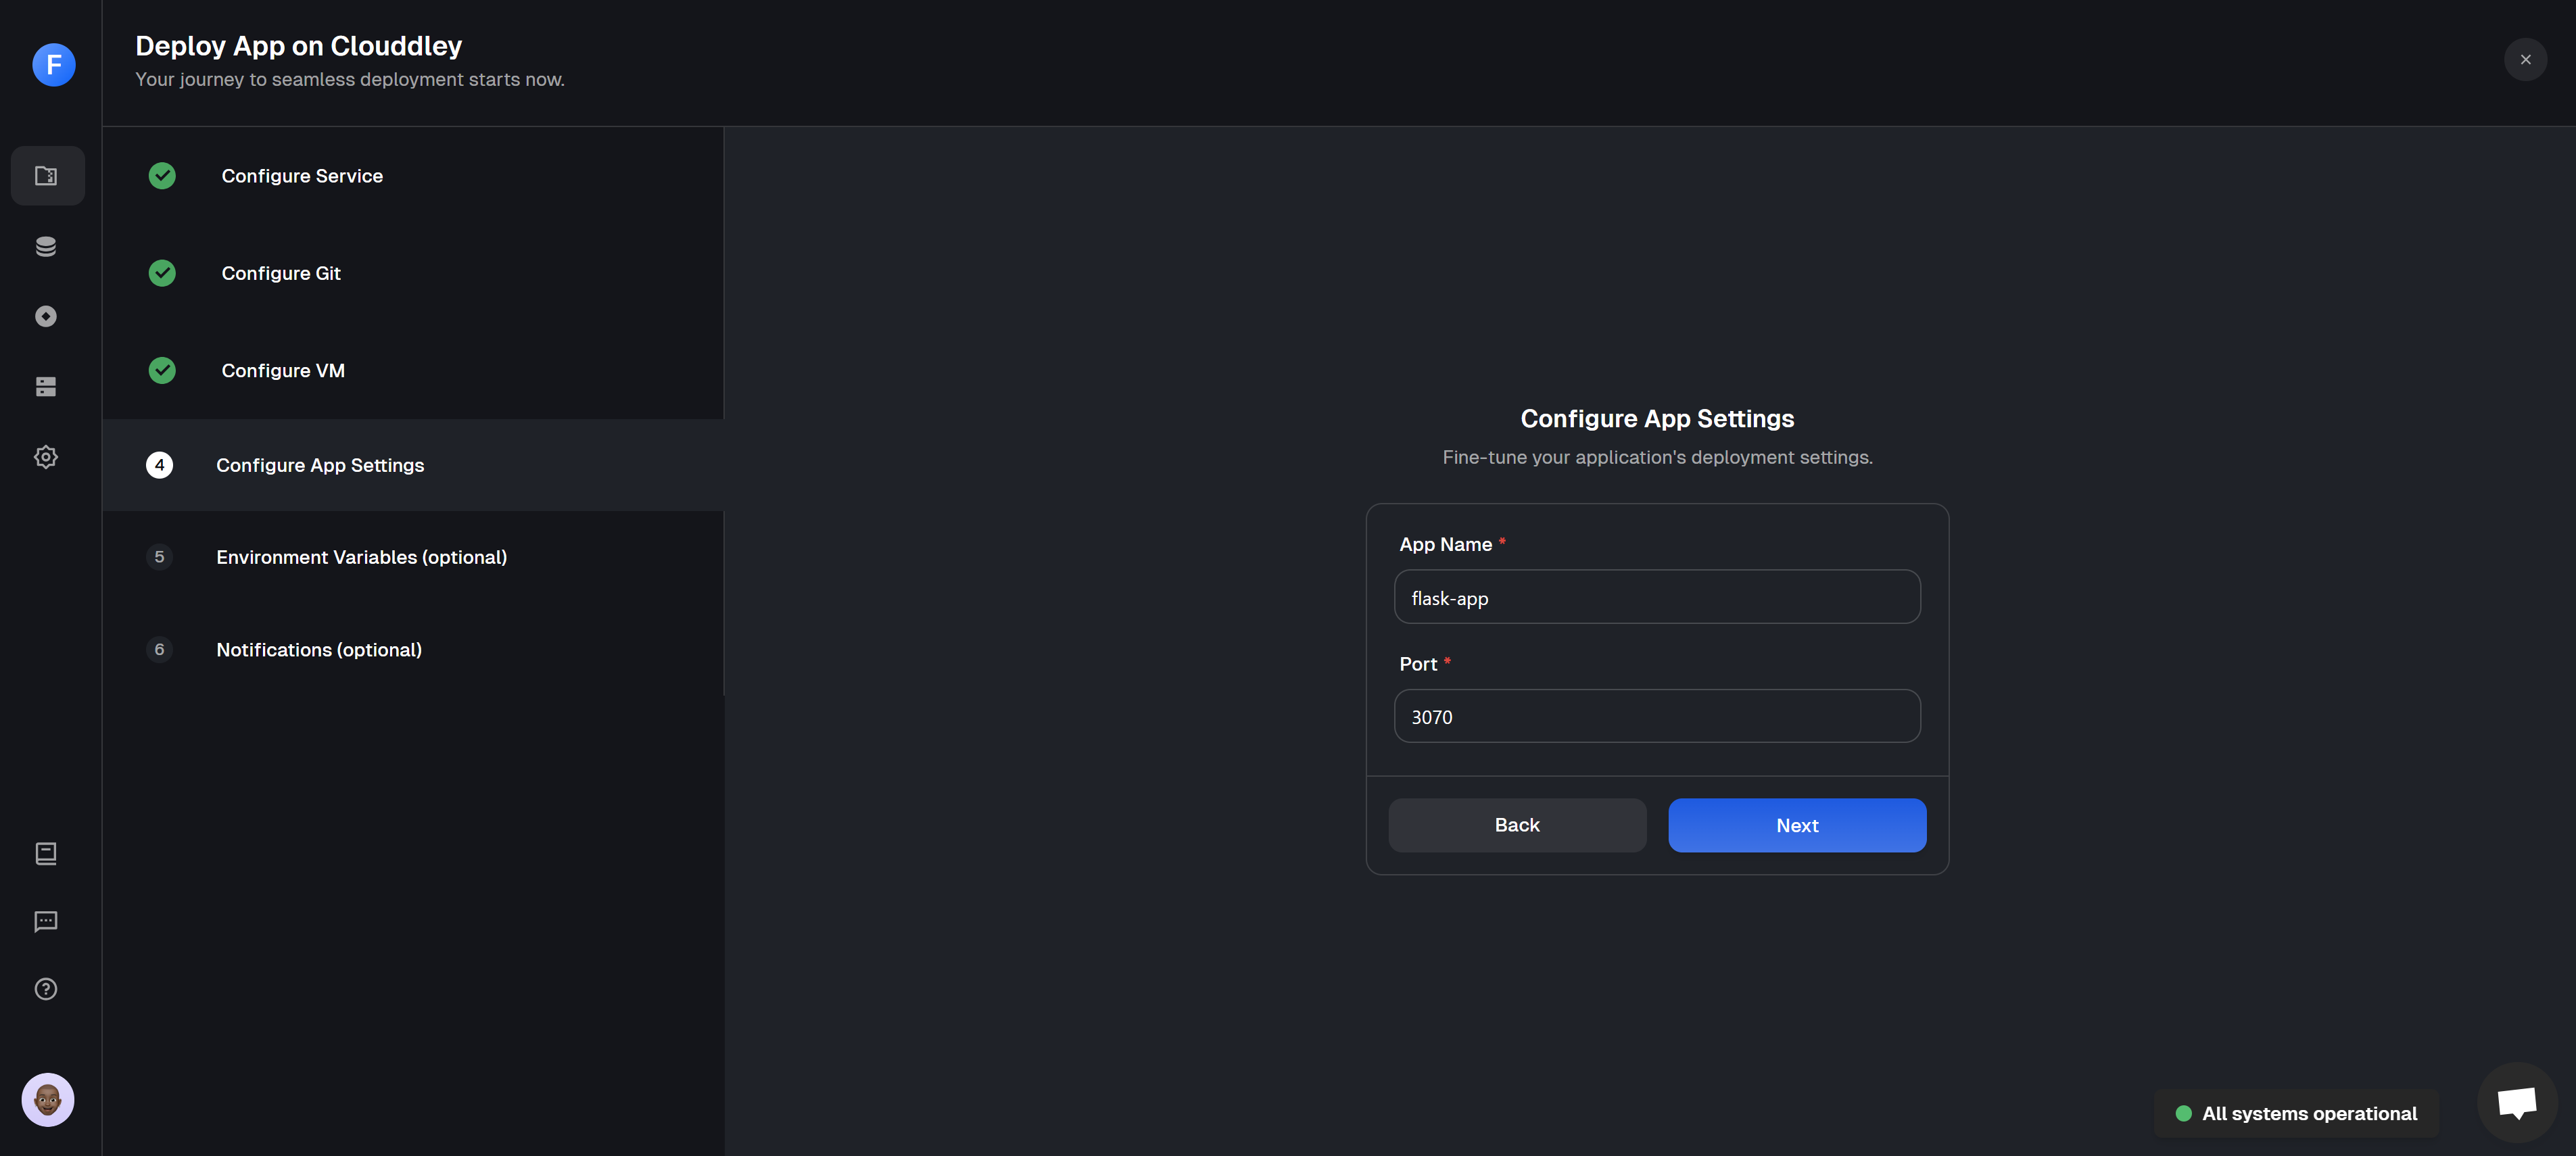
Step 4: Configure app settings
* Enter the name of your flask application and the port it runs on.
* Click on **Next.**
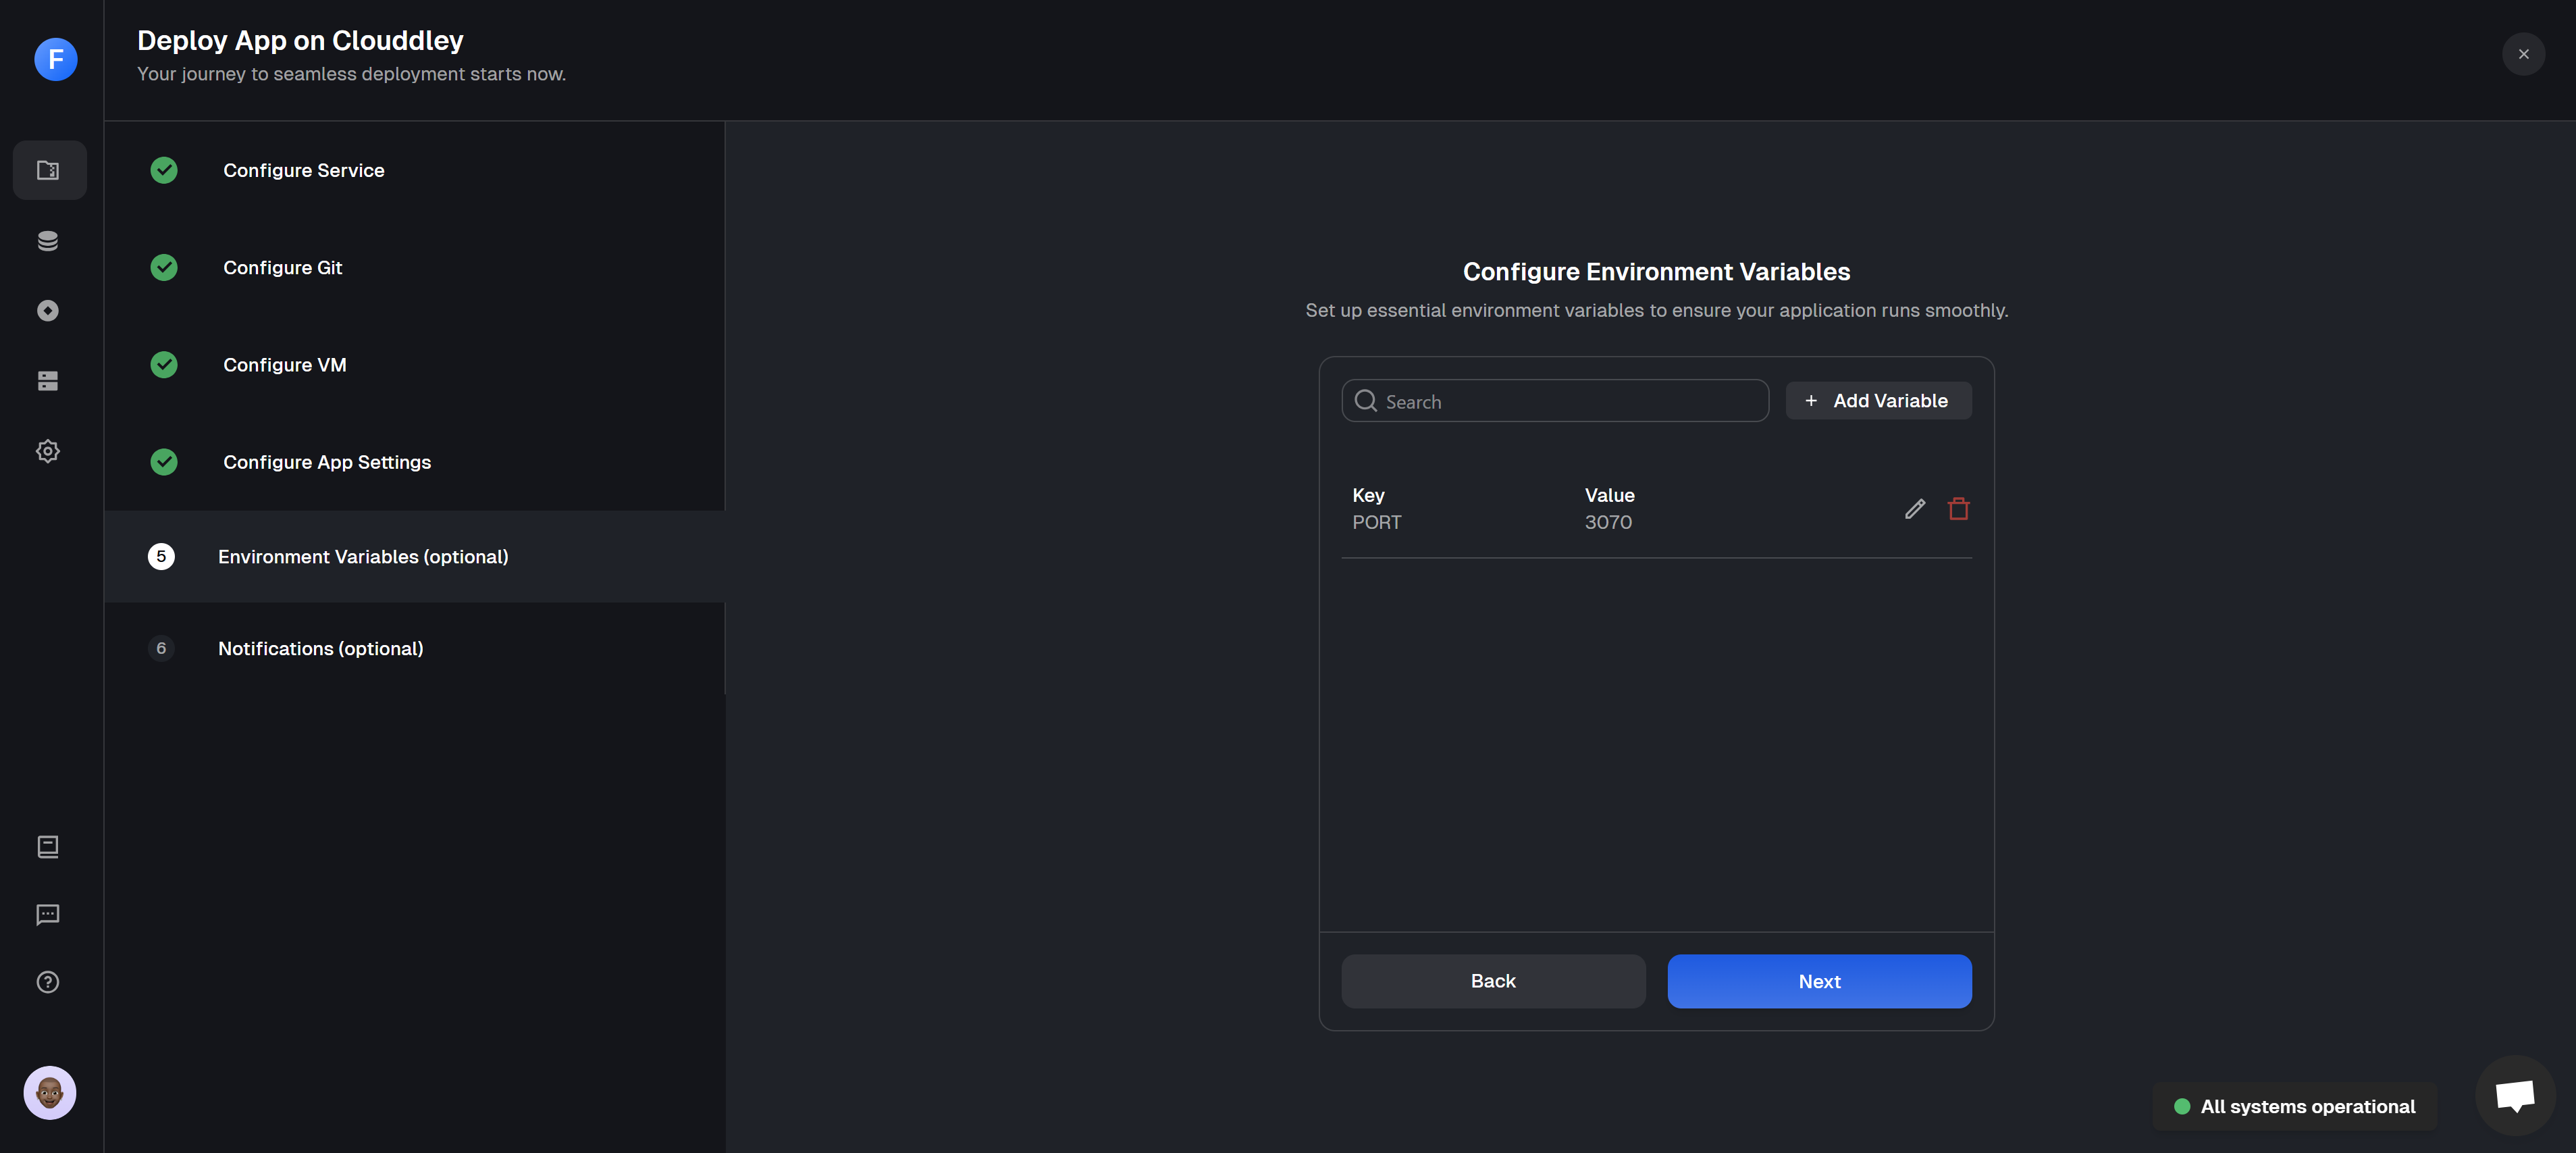
The firewall of the virtual machine should allow access to the application port.Step 5: Configure Environment Variables
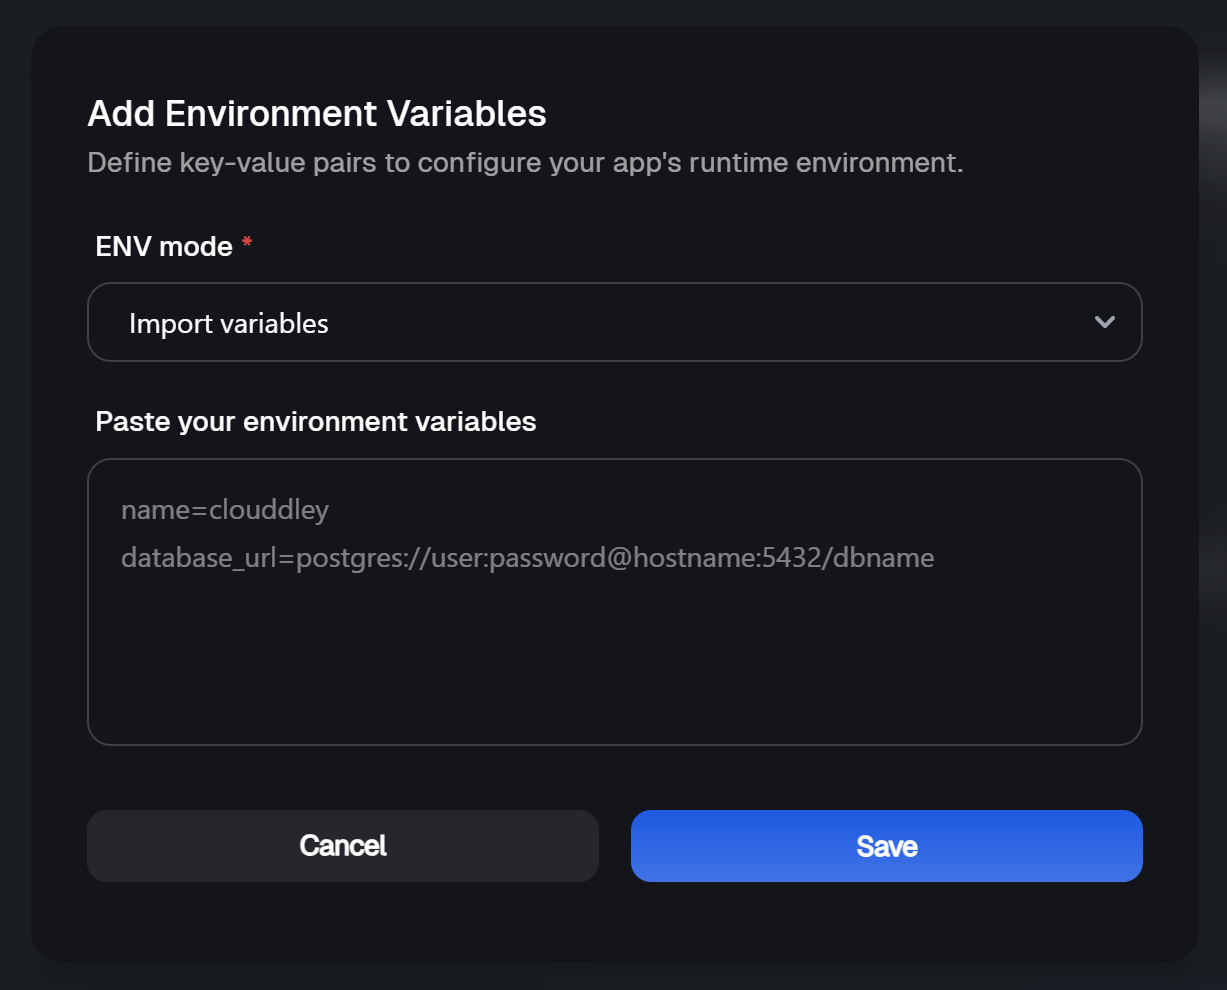
* To add environment variables, click on Add Variable
* Choose an ENV mode: either a single variable or import variables. Learn more [here](https://docs.clouddley.com/apps/extras/environment-variables).
* Add the key-value pairs your app needs and click on Save
* Click on Next Step 6: Setup Notifications (optional)
* To configure the notifications settings of the application, click on Add Alert
* Select the Alert type. For this tutorial, we will set up Email Alerts.
* Toggle the events you want to track; failed, timed out, or successful deployments.
* Enter the Email address where you want to receive alerts. (You can add multiple email addresses)
* Click on Save
* Click on Deploy Step 7: Test and Verify the app
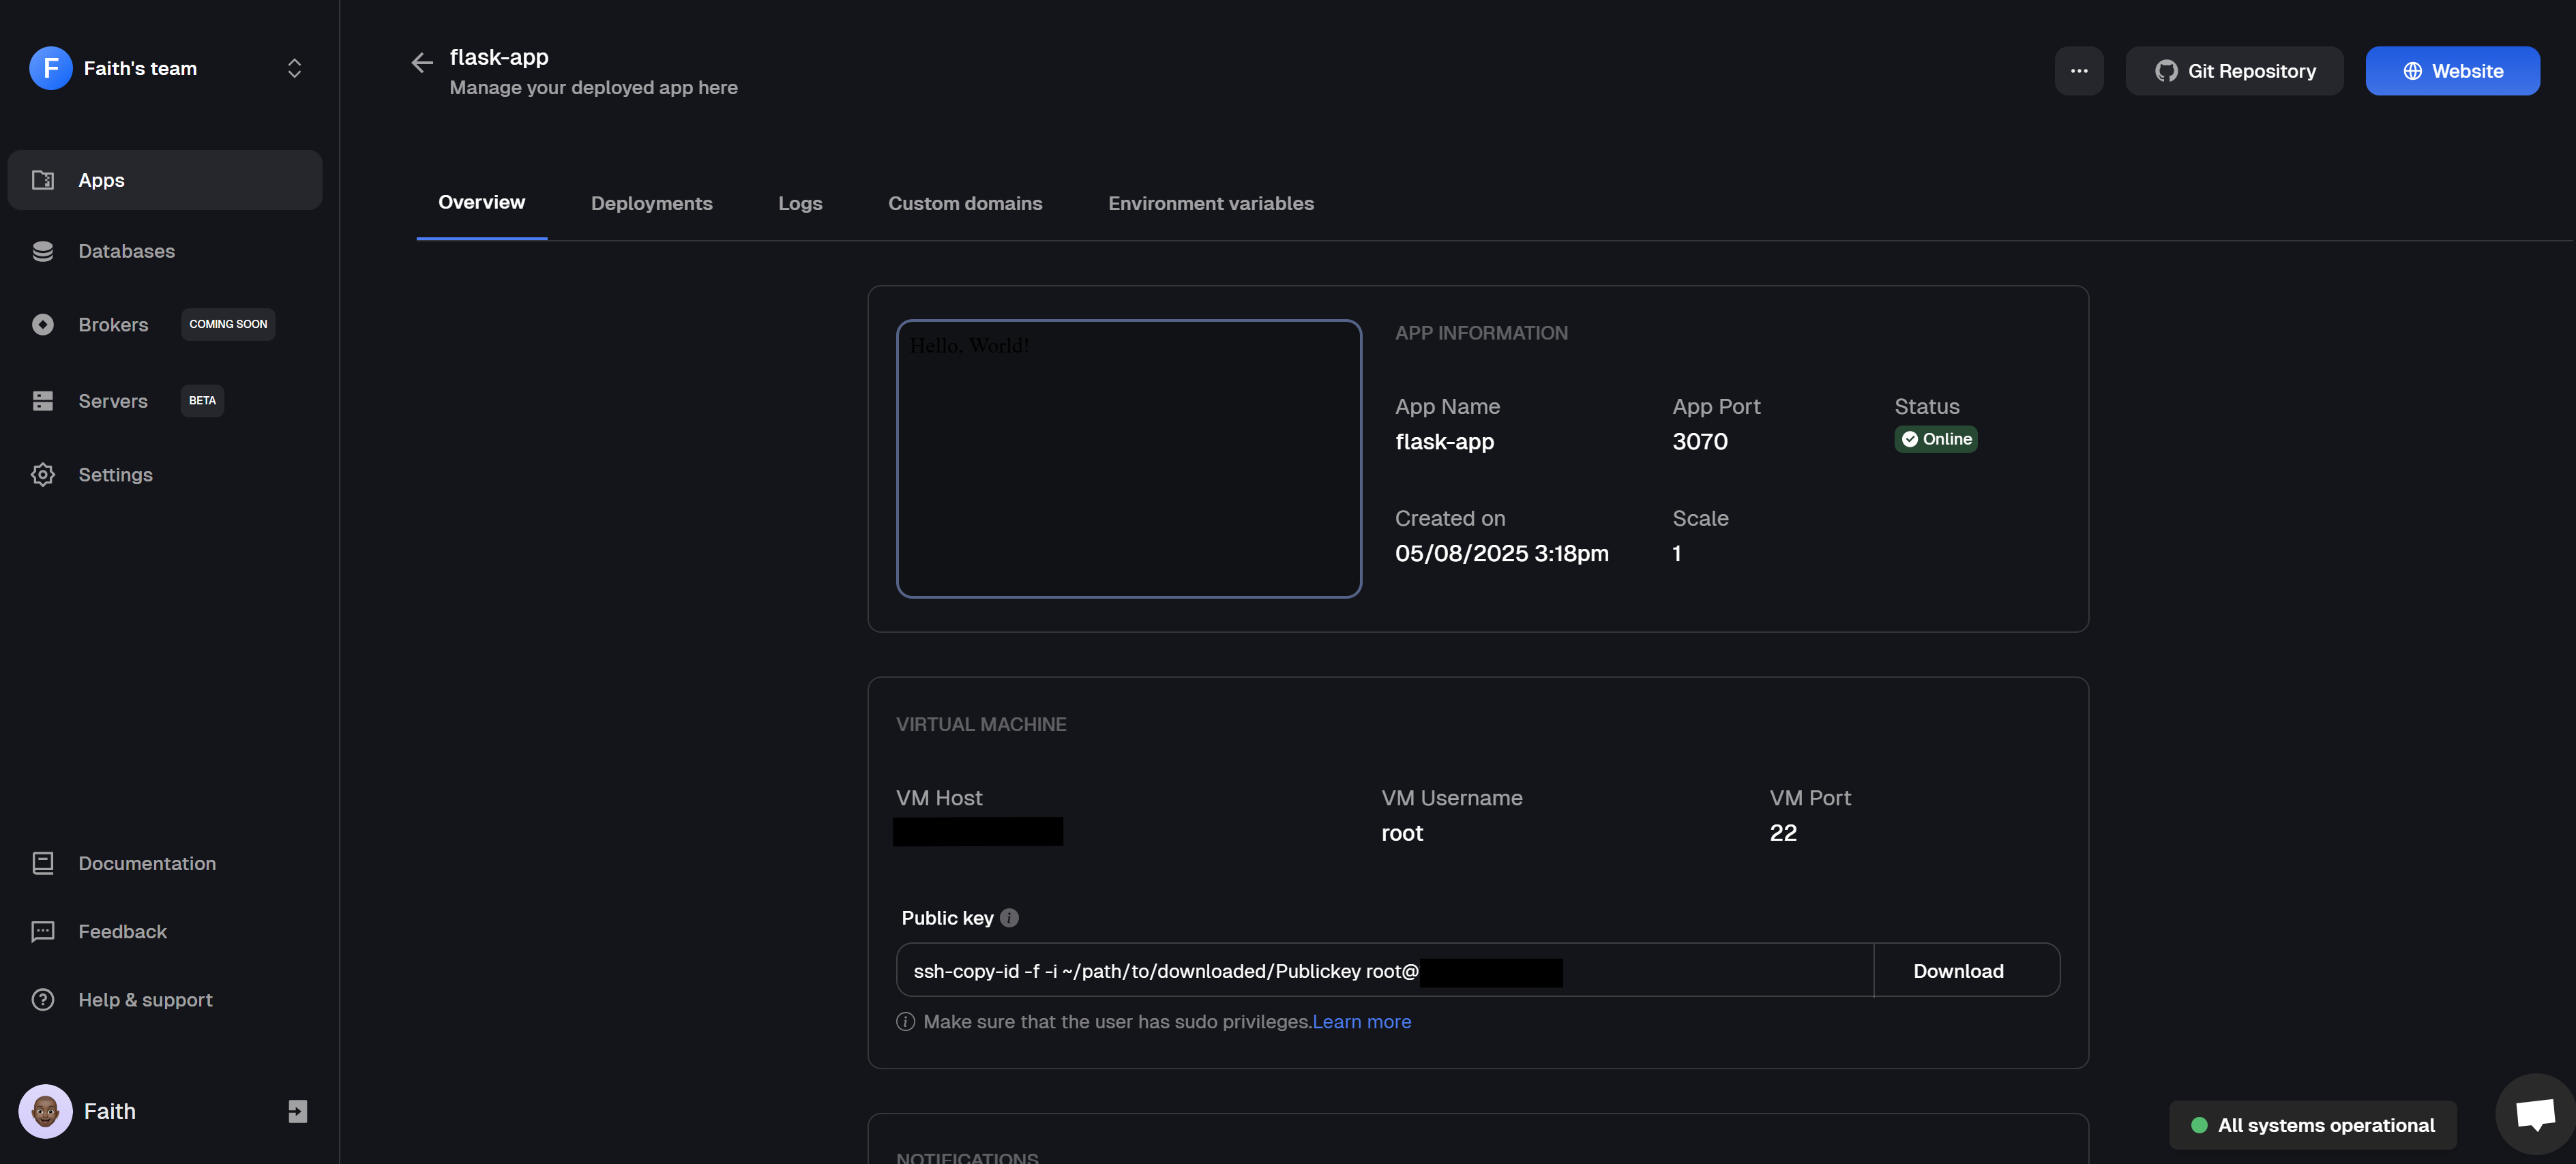
* Once deployed, click on Go to Dashboard. Your app will be visible on the apps dashboard.
* When the status changes from `Deploying` to `Online`, your Flask app is live!
* To check it out, click the 🌐 Website button at the top right and this will open your deployed app in a new browser tab
* Now, go ahead and test its functionality to make sure everything's working just right.
## Post-Deployment: Managing Your Flask App
After deploying your Flask app to a DigitalOcean Droplet using Clouddley, you can manage everything from the apps dashboard, there is no need to log into the server.\
You can modify deployment settings, [scale](https://docs.clouddley.com/apps/extras/scale-applications-on-clouddley) your app, [roll back](https://docs.clouddley.com/apps/extras/how-to-rollback-an-application) to a previous version, [pause or resume](https://docs.clouddley.com/apps/extras/how-to-pause-and-resume-applications) the app, or delete it when needed. The dashboard also includes helpful features like deployment history, live logs, [environment variables](https://docs.clouddley.com/apps/extras/environment-variables) management, and [custom domain](https://docs.clouddley.com/apps/extras/custom-domain) setup, making it easy to stay on top of your app after deployment.
Want to build Flask apps that are clean, reliable, and easy to scale? Here are some best practices worth sticking to:
Structure your project well\
Organize your code into modules and folders to keep things tidy and scalable.
Use virtual environments\
Isolate your dependencies so your project doesn’t clash with others on your system.
Keep secrets out of your code\
Store API keys and config values in environment variables and not directly in your files.
Break your app into Blueprints\
Blueprints help separate concerns and make large apps easier to manage.
Handle errors gracefully\
Set up custom error pages and log issues for smoother debugging and better UX.
Don’t use the dev server in production\
Always run Flask with a WSGI server like Gunicorn when deploying live.
Add basic logging\
Logging helps you spot issues early and track what’s happening in your app.
Test your app\
Even a few simple tests can save you from big surprises later.
Secure your app\
Watch out for CSRF, input validation, and other common web vulnerabilities.
Keep your packages updated\
Regularly update your dependencies to patch bugs and stay secure.
## Conclusion
And that’s a wrap! You’ve just seen how simple it is to deploy your Flask app to a DigitalOcean Droplet using Clouddley. We built Clouddley to take the stress out of deployments so you can spend more time building and less time configuring.
Got feedback or ideas to improve the experience? We’d love to [hear from you](https://clouddley.productlane.com/roadmap). We can’t wait to see what you deploy next!
A backend infrastructure for your own compute. Run apps, databases, brokers, and AI workloads on your VMs, bare metal, or VPS.
## Additional Resources
Here are some helpful links to keep learning and refining your deployment setup:
* [Clouddley Documentation](https://docs.clouddley.com/)
* [Run Dockerfile on Clouddley](https://docs.clouddley.com/apps/extras/deploy-an-application-with-a-dockerfile-on-clouddley)
* [DigitalOcean Droplet guides](https://docs.digitalocean.com/products/droplets/)
* [Official Flask documentation](https://flask.palletsprojects.com/en/stable/tutorial/)
* [GitHub Docs](https://docs.github.com/en)

 You’ve successfully created a Droplet named `app-droplet` using the `Ubuntu 24.10 x64` image, located in the `nyc1` region.
* To confirm that your Droplet was created successfully, run the command:
```bash theme={null}
doctl compute droplet list
```
This will display all your active Droplets, along with their names, IPs, and statuses.
You’ve successfully created a Droplet named `app-droplet` using the `Ubuntu 24.10 x64` image, located in the `nyc1` region.
* To confirm that your Droplet was created successfully, run the command:
```bash theme={null}
doctl compute droplet list
```
This will display all your active Droplets, along with their names, IPs, and statuses.
 Make sure to note the **public IP address** for SSH access.
## Deploy
Your Flask app and DigitalOcean Droplet are ready, now you can deploy your app.
* Open your browser and log in to your [Clouddley account](https://app.clouddley.com/auth/signin)
* Navigate to **Apps** and click on Deploy App
Make sure to note the **public IP address** for SSH access.
## Deploy
Your Flask app and DigitalOcean Droplet are ready, now you can deploy your app.
* Open your browser and log in to your [Clouddley account](https://app.clouddley.com/auth/signin)
* Navigate to **Apps** and click on Deploy App