> ## Documentation Index
> Fetch the complete documentation index at: https://blog.clouddley.com/llms.txt
> Use this file to discover all available pages before exploring further.
# How to Build a Weather Alert MCP Server in Python and Deploy it with Clouddley
> Learn how to create a weather alert server using Python, OpenWeatherMap API, and deploy it with Clouddley.
export const date_0 = "Updated on June 23, 2025"
Let's build a weather alert [MCP](https://modelcontextprotocol.io/introduction) server in Python that integrates with AI assistants through the Model Context Protocol. You'll create a [FastAPI](https://fastapi.tiangolo.com/) server that fetches real-time weather data, deploy it to a virtual machine using [Clouddley](https://clouddley.com), then test it locally with the [Cline](https://docs.cline.bot/getting-started/for-new-coders) VS Code extension.
Your server will provide forecasts, send alerts, and respond to natural language weather queries.
## Prerequisites
Before you start, ensure you have the following prerequisites:
* A [Clouddley](https://clouddley.com) account
* A [GitHub](https://github.com/) or [Bitbucket](https://bitbucket.org/product/) account
* [Python 3.8](https://www.python.org/downloads/) or higher installed on your machine
* An account on [OpenWeatherMap](https://openweathermap.org/api) to get an API key
* Basic command line skills
* A virtual machine or server
## Creating the FastAPI Weather Alert MCP Server
Create a new directory for your project and navigate into it.
```bash theme={null}
mkdir weather-alert-mcp
cd weather-alert-mcp
```
It's a good practice to use a virtual environment to manage your Python dependencies. Run the following commands to set up a virtual environment:
```bash theme={null}
python -m venv venv
```
Activate the virtual environment:
* On Windows:
```bash theme={null}
venv\Scripts\activate
```
* On macOS/Linux:
```bash theme={null}
source venv/bin/activate
```
Create a `requirements.txt` file in your project directory with the following content:
```plaintext theme={null}
python-dotenv>=1.0.1
httpx>=0.28.1
mcp[cli]>=1.2.1
starlette>=0.45.3
uvicorn>=0.34.0
```
Install the required packages using pip:
```bash theme={null}
pip install -r requirements.txt
```
Create a `.gitignore` file in your project directory to exclude unnecessary files from version control:
```plaintext theme={null}
venv/
__pycache__/
*.pyc
.env
```
Create a `.env` file in your project directory to store your OpenWeatherMap API key:
```plaintext theme={null}
OPENWEATHER_API_KEY=your_openweather_api_key_here
```
Make sure to replace `your_openweather_api_key_here` with your actual OpenWeatherMap API key. You can get an API key by signing up at [OpenWeatherMap](https://openweathermap.org/api).
Create a new file named `main.py` and add the following code:
```python theme={null}
import os
import argparse
from typing import Any
import httpx
from dotenv import load_dotenv
from mcp.server.fastmcp import FastMCP
from starlette.applications import Starlette
from starlette.requests import Request
from starlette.responses import StreamingResponse
from starlette.routing import Mount, Route
from mcp.server.sse import SseServerTransport
from mcp.server import Server
import uvicorn
# Load environment variables
load_dotenv()
# Initialize FastMCP server for Weather tools (SSE)
mcp = FastMCP("weather-openweather")
# Constants
OPENWEATHER_API_KEY = os.getenv("OPENWEATHER_API_KEY")
if not OPENWEATHER_API_KEY:
raise ValueError("Missing OpenWeather API key. Set OPENWEATHER_API_KEY in .env file.")
OPENWEATHER_BASE_URL = "https://api.openweathermap.org/data/2.5"
USER_AGENT = "weather-mcp-server/1.0"
async def make_openweather_request(endpoint: str, params: dict) -> dict[str, Any] | None:
"""Make a request to the OpenWeather API with proper error handling."""
headers = {
"User-Agent": USER_AGENT,
}
# Add API key to params
params["appid"] = OPENWEATHER_API_KEY
url = f"{OPENWEATHER_BASE_URL}/{endpoint}"
async with httpx.AsyncClient() as client:
try:
response = await client.get(url, headers=headers, params=params, timeout=30.0)
response.raise_for_status()
return response.json()
except httpx.HTTPStatusError as e:
print(f"HTTP error {e.response.status_code}: {e.response.text}")
return None
except Exception as e:
print(f"Request error: {e}")
return None
def format_weather_data(data: dict, units: str = "metric") -> str:
"""Format weather data into a readable string."""
try:
location = f"{data['name']}, {data['sys']['country']}"
temp = data['main']['temp']
feels_like = data['main']['feels_like']
humidity = data['main']['humidity']
wind_speed = data['wind'].get('speed', 0)
wind_dir = data['wind'].get('deg', 0)
conditions = data['weather'][0]['description'].title()
# Set temperature unit based on API units parameter
if units == "metric":
temp_unit = "C"
elif units == "imperial":
temp_unit = "F"
else:
temp_unit = "K"
return f"""🌤️ Weather for {location}
Temperature: {temp:.1f}°{temp_unit} (feels like {feels_like:.1f}°{temp_unit})
Conditions: {conditions}
Humidity: {humidity}%
Wind: {wind_speed} m/s at {wind_dir}°
"""
except KeyError as e:
return f"Error formatting weather data: missing field {e}"
def format_forecast_data(data: dict, units: str = "metric") -> str:
"""Format forecast data into a readable string."""
try:
city_info = data['city']
location = f"{city_info['name']}, {city_info['country']}"
# Set temperature unit based on API units parameter
if units == "metric":
temp_unit = "C"
elif units == "imperial":
temp_unit = "F"
else:
temp_unit = "K"
forecast_text = f"🔮 5-Day Forecast for {location}\n\n"
# Group forecasts by date
daily_forecasts = {}
for item in data['list'][:15]: # Limit to 15 items (about 5 days)
date = item['dt_txt'].split(' ')[0]
if date not in daily_forecasts:
daily_forecasts[date] = []
daily_forecasts[date].append(item)
for date, forecasts in daily_forecasts.items():
forecast_text += f"📅 {date}:\n"
for forecast in forecasts[:3]: # Show first 3 forecasts per day
time = forecast['dt_txt'].split(' ')[1][:5] # HH:MM
temp = forecast['main']['temp']
conditions = forecast['weather'][0]['description'].title()
forecast_text += f" {time}: {temp:.1f}°{temp_unit} - {conditions}\n"
forecast_text += "\n"
return forecast_text
except KeyError as e:
return f"Error formatting forecast data: missing field {e}"
@mcp.tool()
async def get_current_weather(location: str, units: str = "metric") -> str:
"""Get current weather information for a specified location.
Args:
location: The location to get weather for (city name, city,country, etc.)
units: Temperature units (metric, imperial, or kelvin). Default is metric.
"""
params = {
'q': location,
'units': units
}
data = await make_openweather_request('weather', params)
if not data:
return f"Unable to fetch weather data for '{location}'. Please check the location name and try again."
return format_weather_data(data, units)
@mcp.tool()
async def get_weather_forecast(location: str, units: str = "metric") -> str:
"""Get 5-day weather forecast for a specified location.
Args:
location: The location to get forecast for (city name, city,country, etc.)
units: Temperature units (metric, imperial, or kelvin). Default is metric.
"""
params = {
'q': location,
'units': units
}
data = await make_openweather_request('forecast', params)
if not data:
return f"Unable to fetch forecast data for '{location}'. Please check the location name and try again."
return format_forecast_data(data, units)
@mcp.tool()
async def get_weather_by_coordinates(latitude: float, longitude: float, units: str = "metric") -> str:
"""Get current weather information for specific coordinates.
Args:
latitude: Latitude of the location
longitude: Longitude of the location
units: Temperature units (metric, imperial, or kelvin). Default is metric.
"""
params = {
'lat': latitude,
'lon': longitude,
'units': units
}
data = await make_openweather_request('weather', params)
if not data:
return f"Unable to fetch weather data for coordinates ({latitude}, {longitude})."
return format_weather_data(data, units)
def create_starlette_app(mcp_server: Server, *, debug: bool = False) -> Starlette:
"""Create a Starlette application that can serve the provided mcp server with SSE."""
sse = SseServerTransport("/messages/")
async def handle_sse(request: Request) -> None:
async with sse.connect_sse(
request.scope,
request.receive,
request._send, # noqa: SLF001
) as (read_stream, write_stream):
await mcp_server.run(
read_stream,
write_stream,
mcp_server.create_initialization_options(),
)
return Starlette(
debug=debug,
routes=[
Route("/sse", endpoint=handle_sse),
Mount("/messages/", app=sse.handle_post_message),
],
)
if __name__ == "__main__":
mcp_server = mcp._mcp_server # noqa: WPS437
parser = argparse.ArgumentParser(description='Run OpenWeather MCP SSE-based server')
parser.add_argument('--host', default='0.0.0.0', help='Host to bind to')
parser.add_argument('--port', type=int, default=int(os.getenv('PORT', 3050)), help='Port to listen on')
args = parser.parse_args()
# Bind SSE request handling to MCP server
starlette_app = create_starlette_app(mcp_server, debug=True)
print(f"Starting OpenWeather MCP Server on {args.host}:{args.port}")
print(f"SSE endpoint: http://{args.host}:{args.port}/sse")
uvicorn.run(starlette_app, host=args.host, port=args.port)
```
This code sets up a FastAPI server that connects applications to real-time weather data using the Model Context Protocol (MCP).
It provides three main functions: `get_current_weather()` for current conditions, `get_weather_forecast()` for 5-day forecasts, and `get_weather_by_coordinates()` for location-based weather using coordinates. The `@mcp.tool()` decorator makes these functions available to AI systems as discoverable tools.
The `make_openweather_request()` function handles API communication with error handling, while formatting functions convert raw data into readable reports. Running on a Starlette server with Server-Sent Events, it creates `/sse` and `/messages/` endpoints for real-time communication, allowing multiple AI applications to access weather data through one reliable service instead of managing API calls individually.
Run the command:
```bash theme={null}
python main.py
```
You should see output indicating the server is running and the SSE endpoint is available.
## Push Your Code to GitHub
Go to [GitHub](https://github.com/) and create a new repository. Give it a name and leave the rest of the settings as default (no README, no .gitignore, you already have those locally).
If you haven’t already, initialize a Git repository in your project folder:
```bash theme={null}
git init
```
Add your files and commit:
```bash theme={null}
git add .
git commit -m "Initial commit"
```
Create a branch and link your local repository to the GitHub repository you created:
```bash theme={null}
git branch -M main
git remote add origin
```
Finally, push your code to GitHub:
```bash theme={null}
git push -u origin main
```
Now your code is pushed to GitHub, it is ready for deployment.
## Deploying on Clouddley
Accessing Apps
* Open your browser and log in to your [Clouddley account](https://app.clouddley.com/auth/signin)
* Navigate to Apps and click on Deploy App Step 1: Configure your service
* Choose your Git provider: either GitHub or Bitbucket. For this guide, we’ll use GitHub.
* Click on Continue with GitHub Step 2: Connect Your Git Repository
* To connect your GitHub user or organization account, click the Select username/organization dropdown and Add GitHub account.
* Once connected, choose the repository and branch that contains your app.
* Click on Next to proceed
Step 3: Connect Your Virtual machine
* From the **Choose or add server** dropdown, select your VM if it appears in the list. If not, click **+ Add Virtual Machine**.
* To add your VM, enter your VM's IP address as VM host, VM user, and the VM port for SSH access.
* Once you've entered the details, verify the connection using the **Clouddley CLI(recommended)** or **SSH**.
- Open your local machine’s command line, then connect to the remote VM you want to configure with Clouddley. Use this command to SSH into your VM:
```bash theme={null}
ssh root@
```
* Install Clouddley CLI by running the command:
```bash theme={null}
curl -L https://raw.githubusercontent.com/clouddley/cli/main/install.sh | sh
```
* To add the SSH public key, run the command:
```bash theme={null}
clouddley add key
```
Using the CLI, you can deploy resources, manage configurations, and automate tasks efficiently.
* Click Verify to test the connection to your VM.
* Once it’s verified, click on Next.
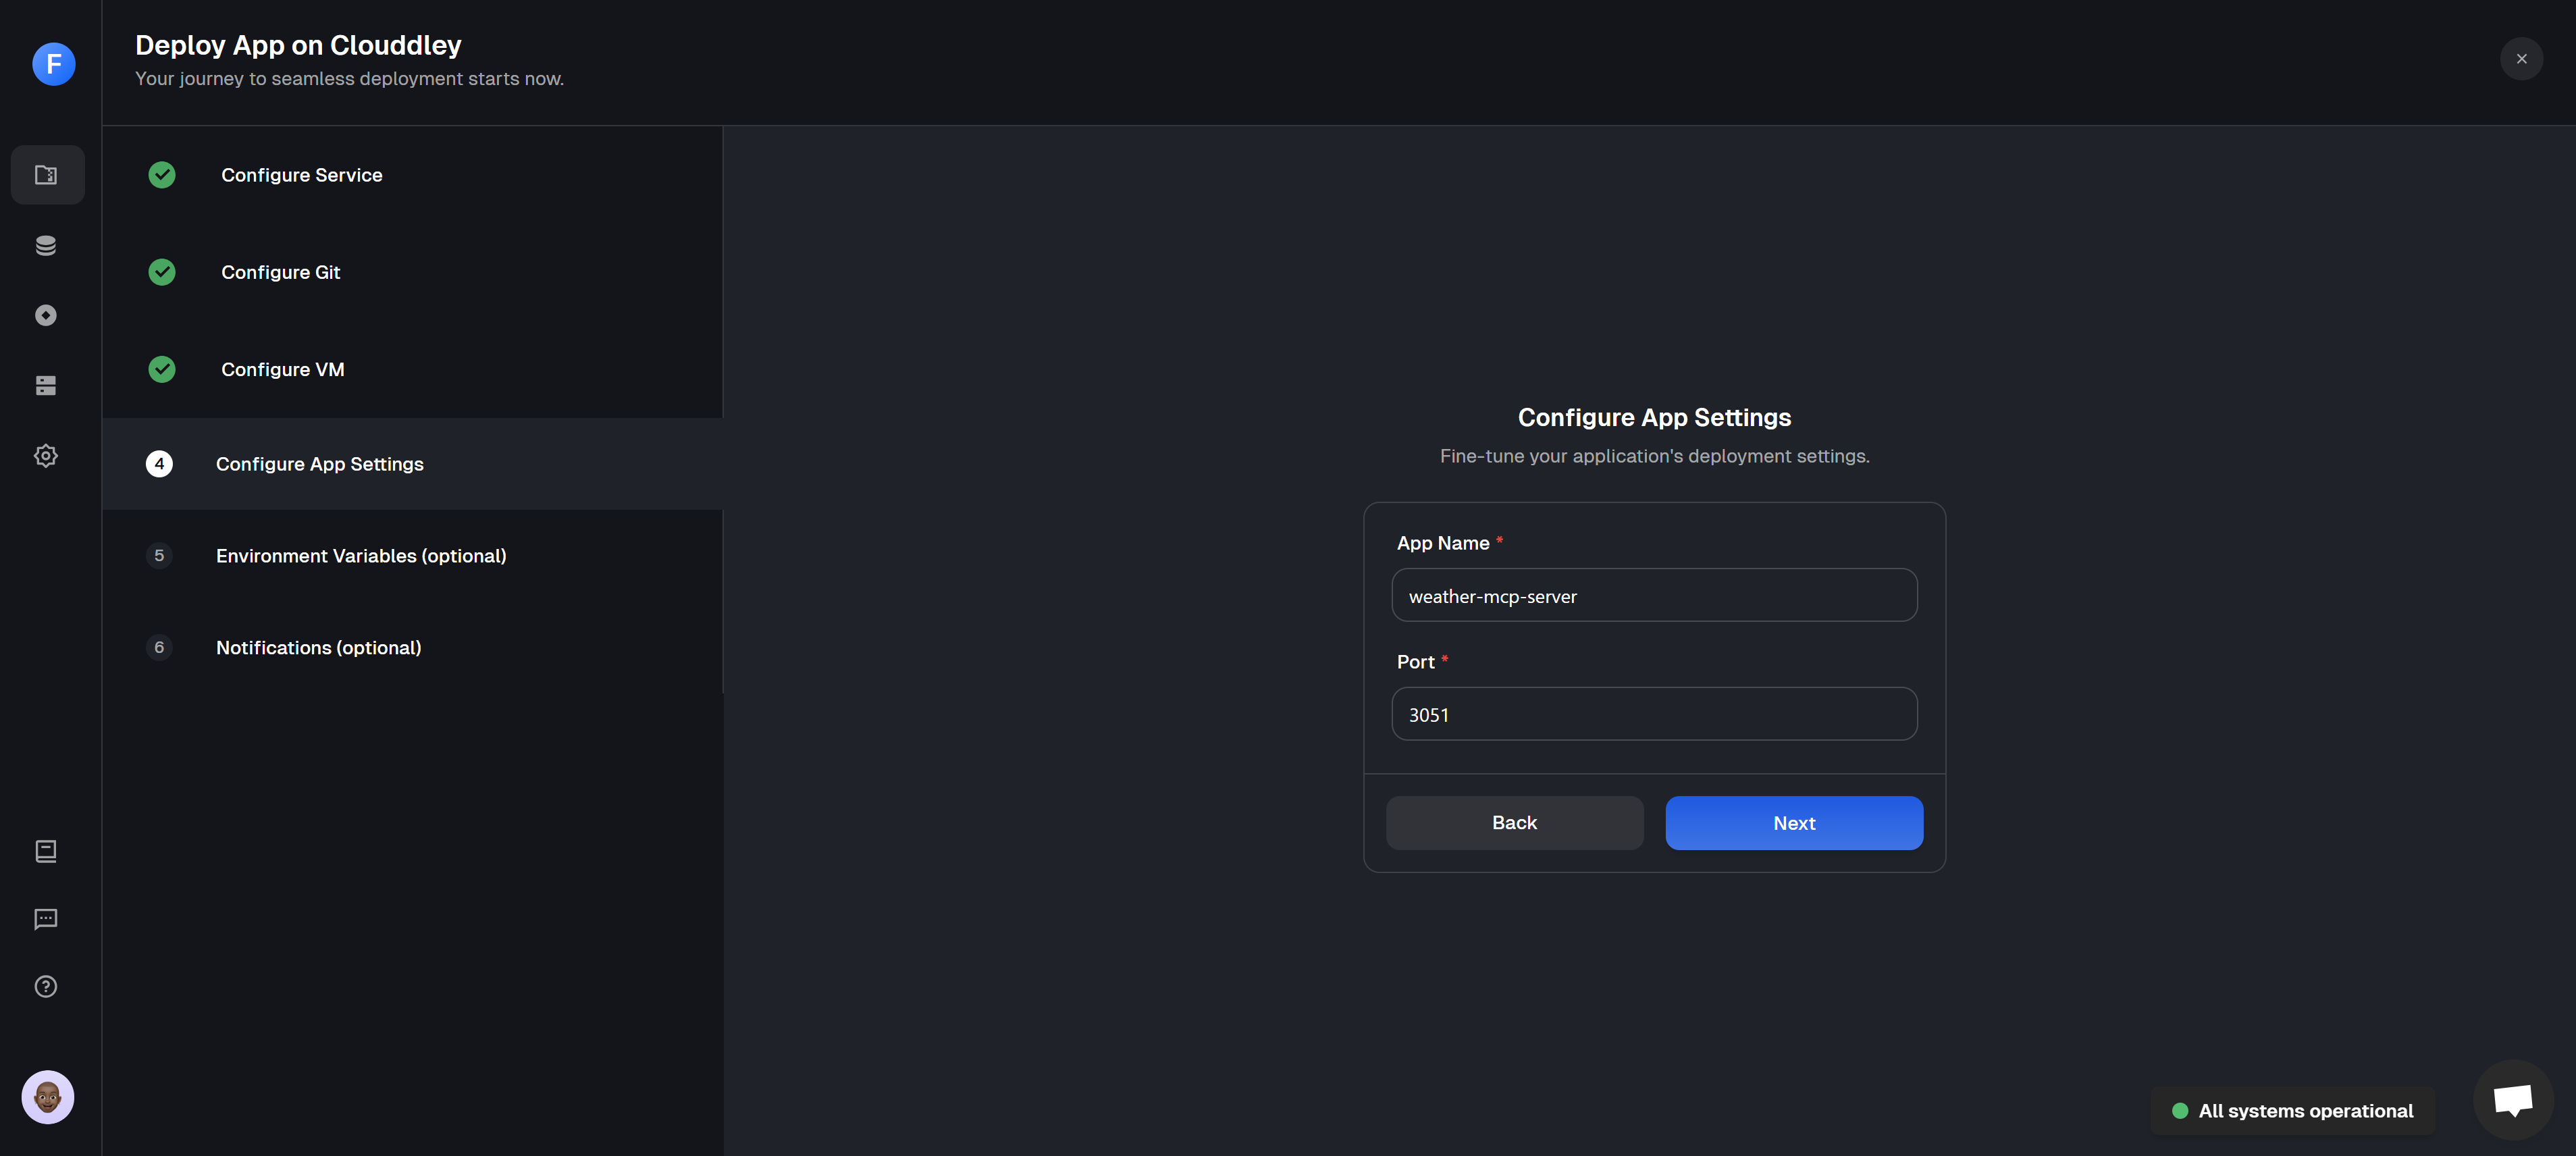
Step 4: Configure app settings
* Enter the name of your app and the port your app will run on.
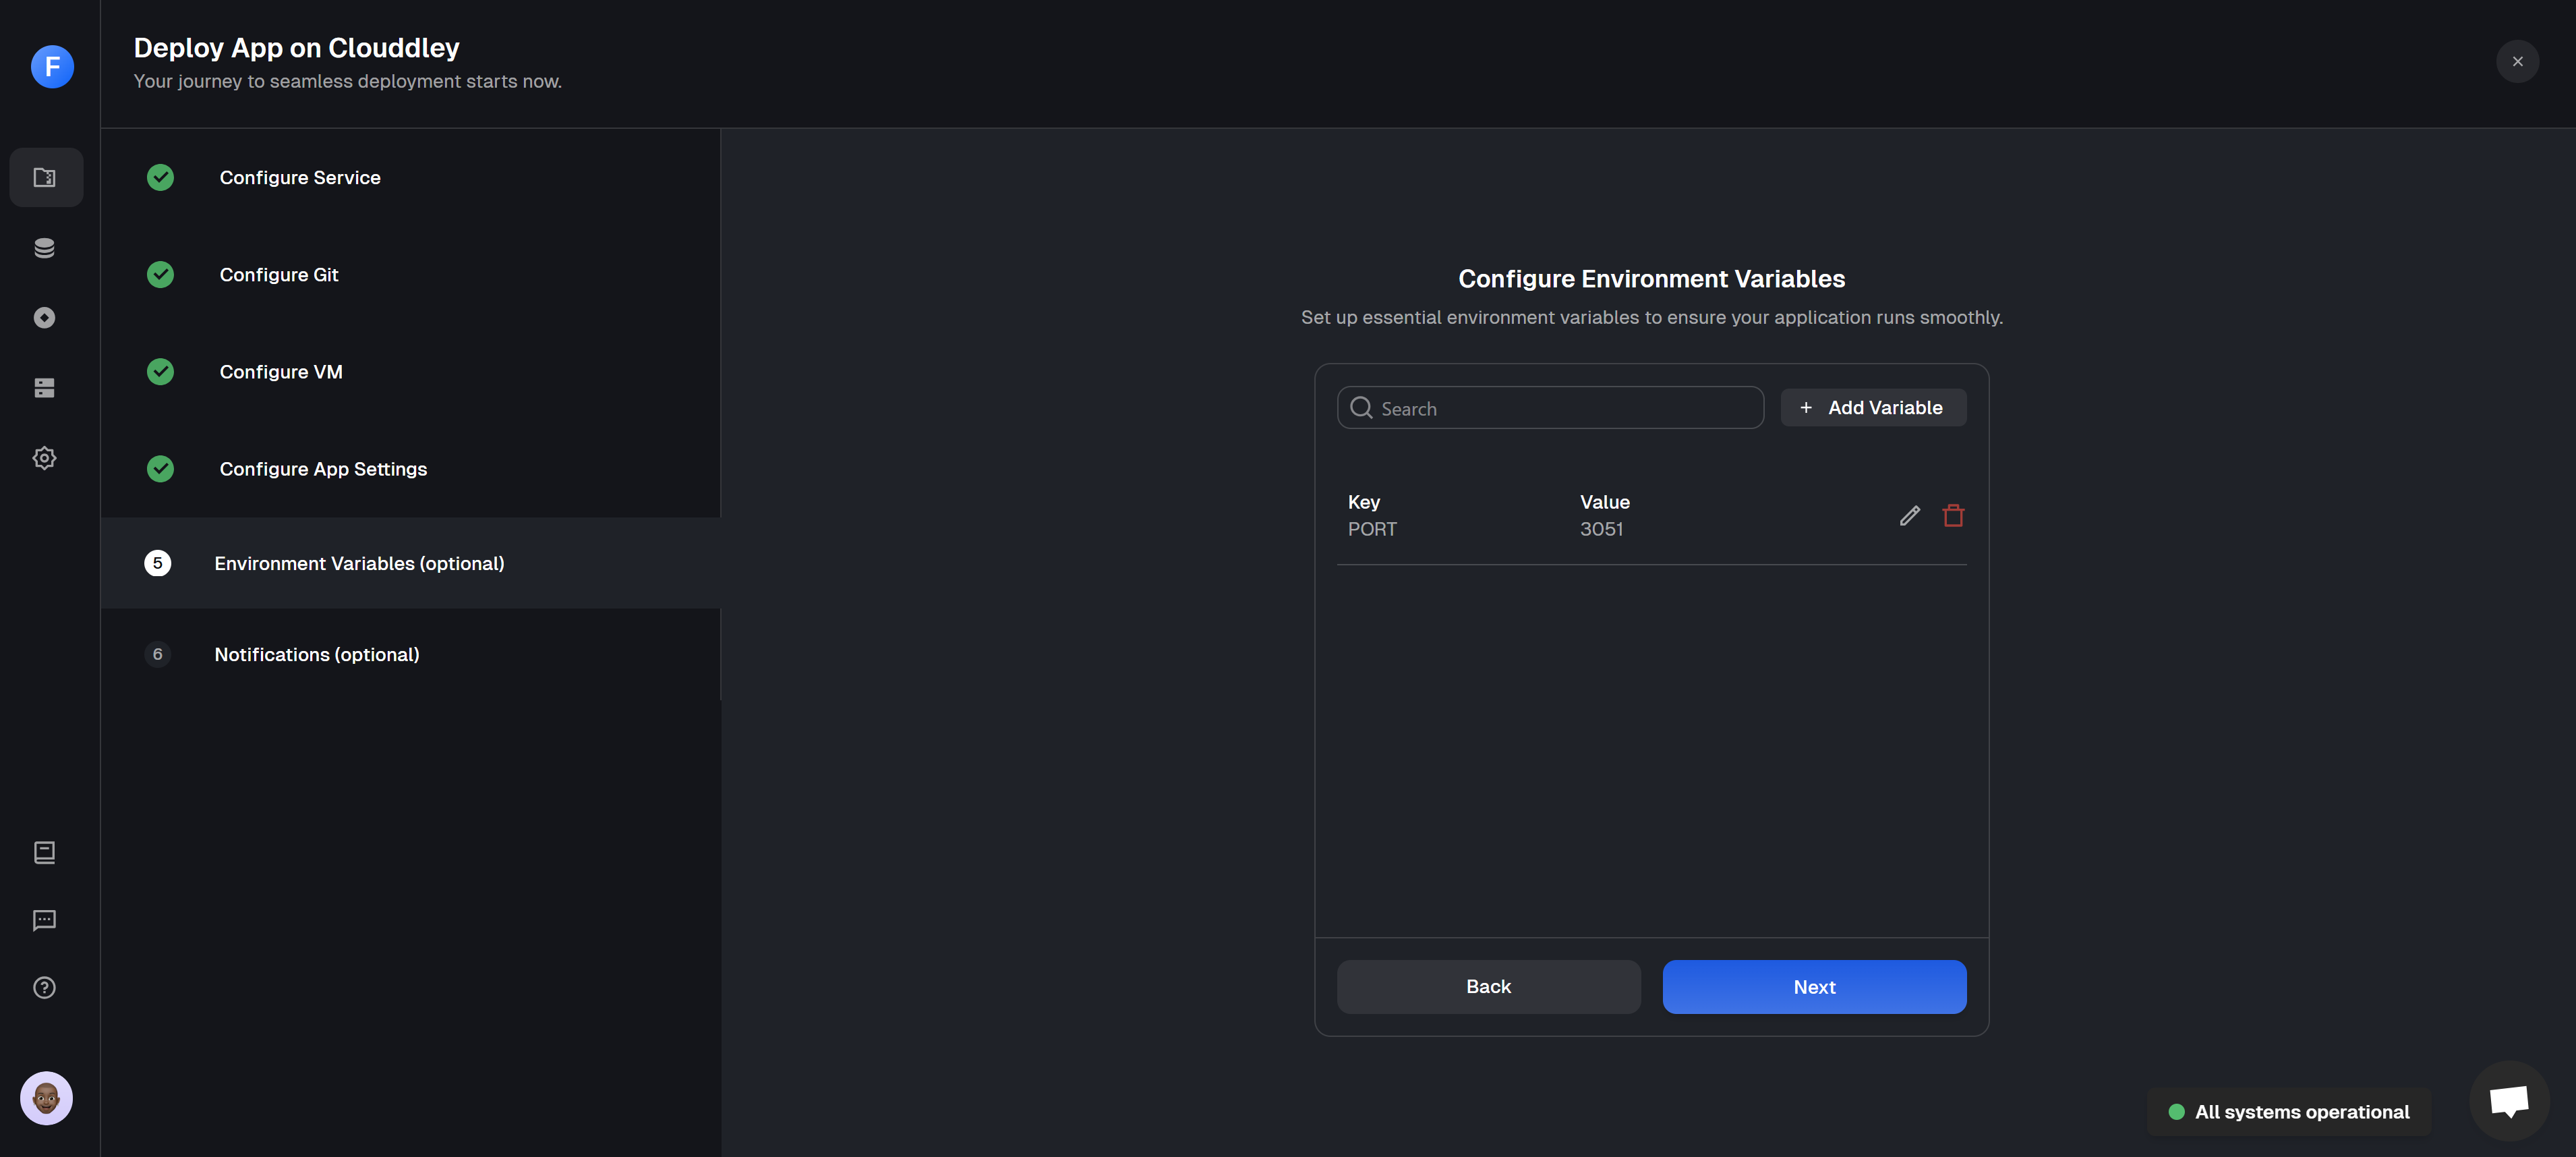
* Click on NextMake sure your Virtual machine’s security group allows traffic on the port your app will use.Step 5: Add Environment Variables
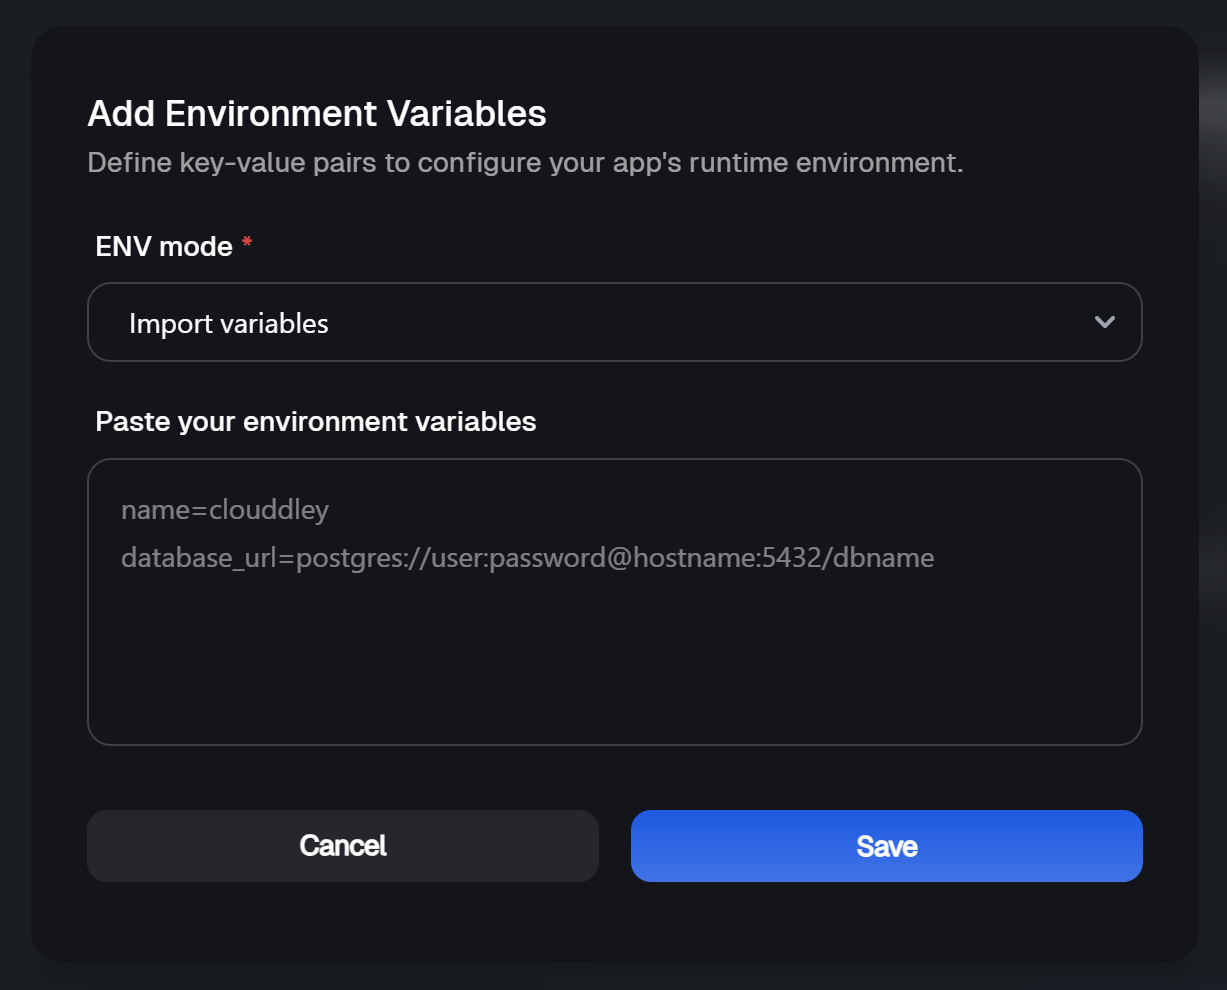
* Click on Add Variable
* Select an ENV mode: either single variable or import variables. Learn more about [Environment Variables](https://docs.clouddley.com/apps/extras/environment-variables).
* Add the key-value pairs and click on Save
* Click on Next Step 6: Setup Notifications (optional)
You can set up notifications to receive updates about your app's deployment status. This step is optional but recommended for monitoring your app.
* To configure the notifications settings of the application, click on Add Alert
* Select the Alert Type. For this guide, we will use Email.
* Toggle on the deployment events you want to be notified of, such as failed, timed out, or success.
* Enter your email address (or multiple, if needed) and click on Save.
* Click on **Deploy**
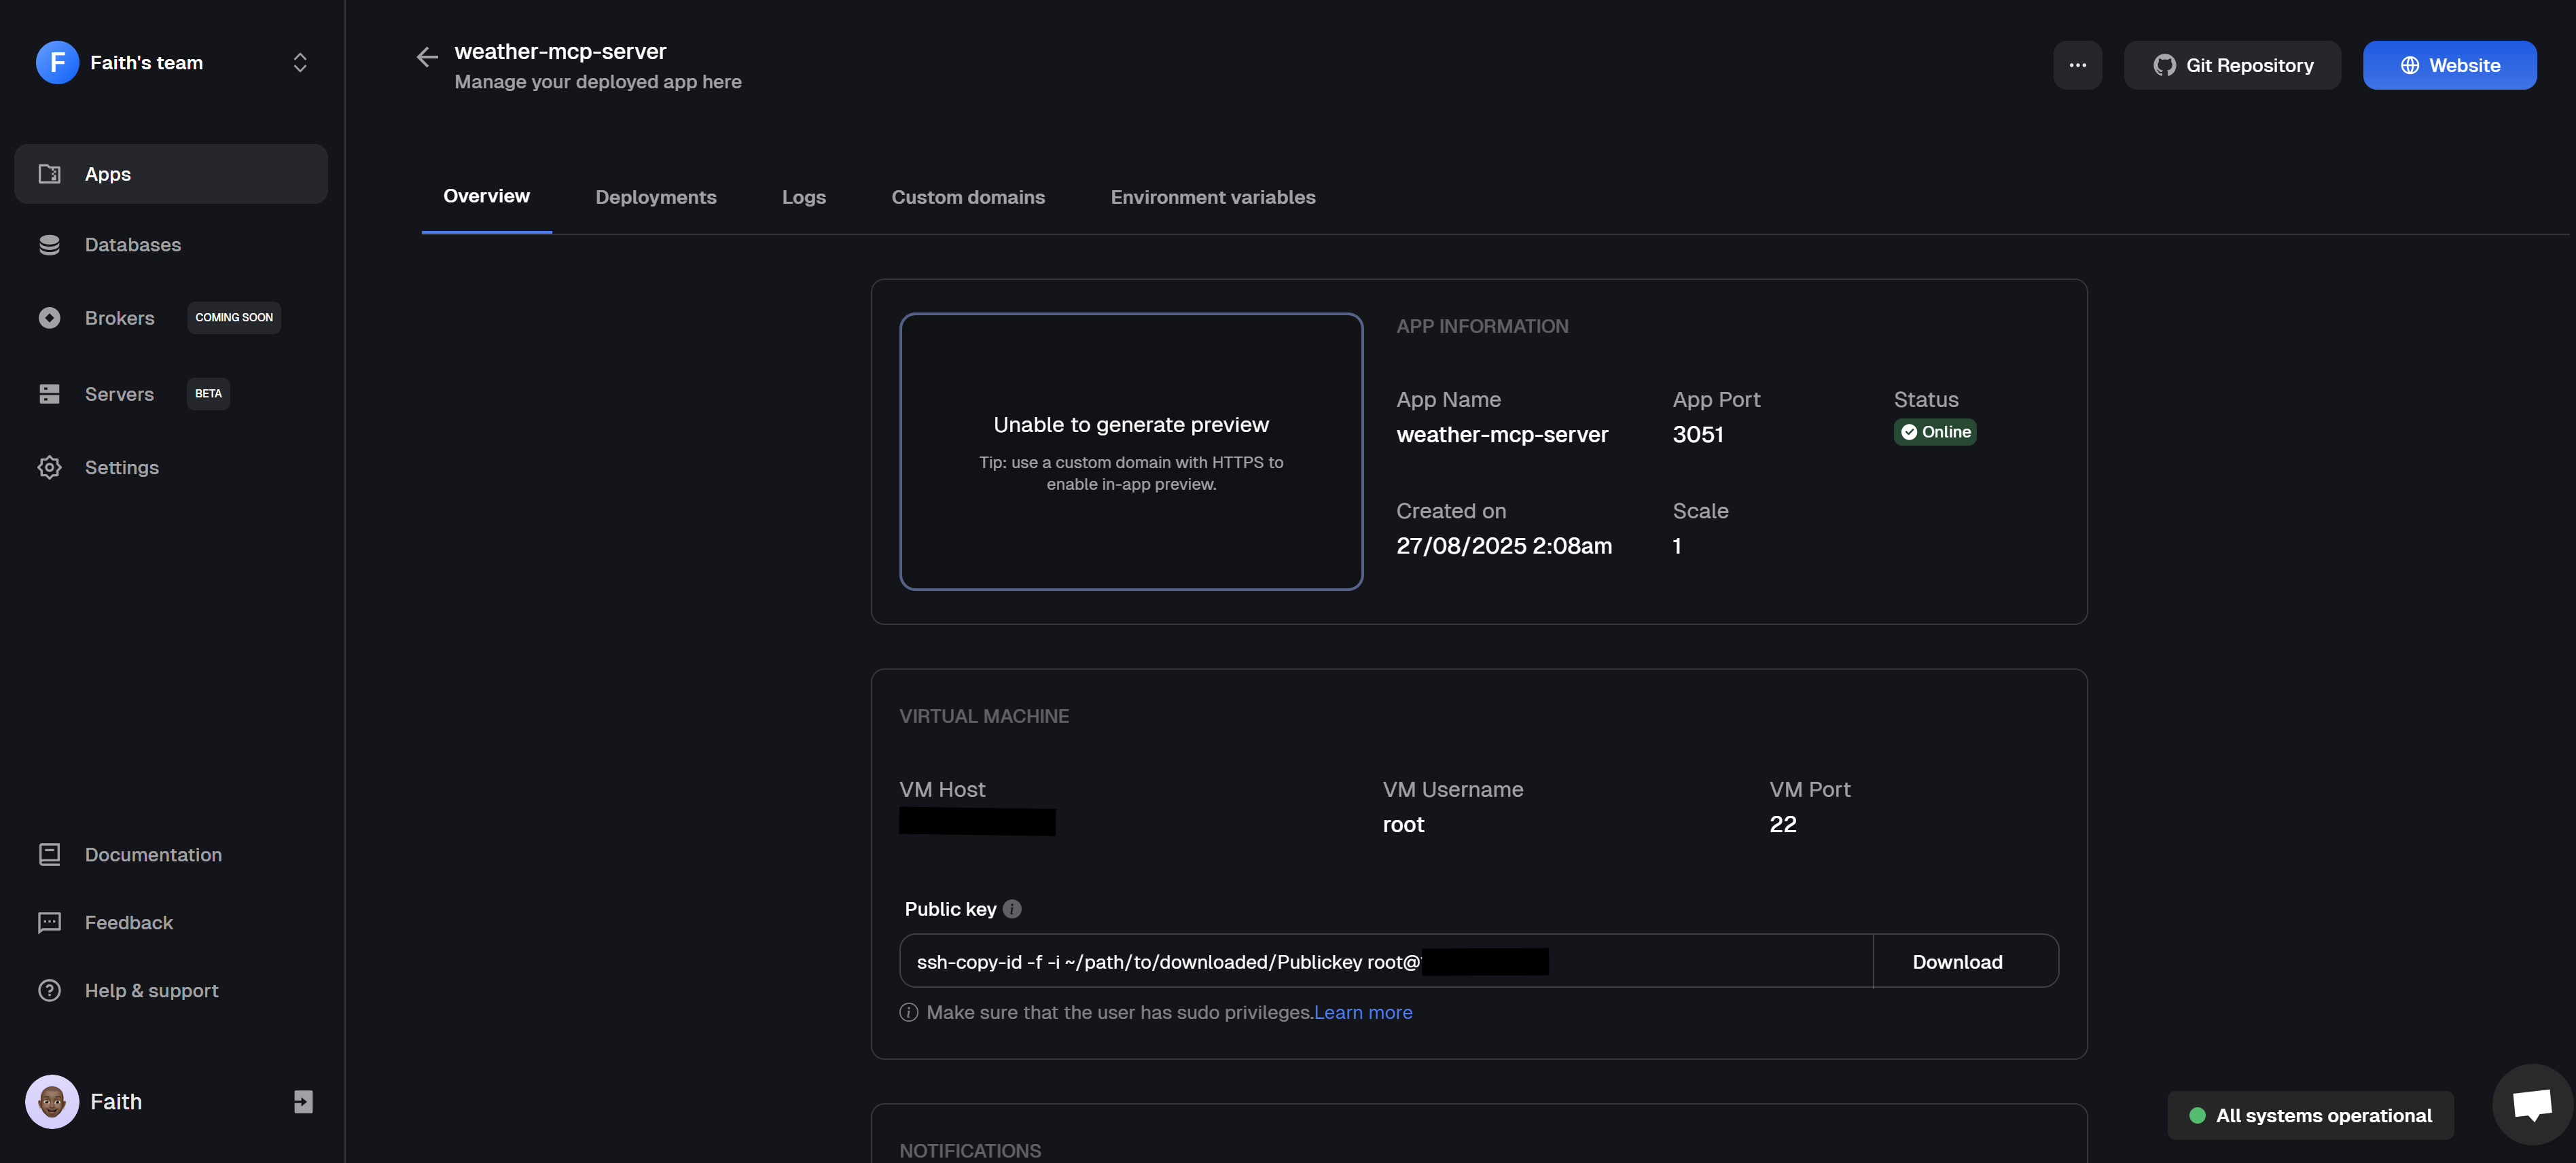
Step 7: Test and Verify the app
* Click on Go to Dashboard. Your app will be visible on the apps dashboard.
* Once deployment completes, its status will update from `Deploying` to `Online`.
Your app is now deployed and running on your Virtual machine. You can access it using the IP address and port you specified during setup. i.e `http://:/sse`
## Testing Locally with Cline
Use the Cline extension to test your FastAPI server locally. Cline interacts with your MCP server through the Model Context Protocol (MCP), letting you send requests and receive real-time responses. Follow these steps to test:
* Open Visual Studio Code and go to the Extensions view by clicking on the Extensions icon in the Activity Bar on the side of the window.
* Search for "Cline" in the Extensions Marketplace.
* Click on the Install button to install the Cline extension.
* Once installed, you can access Cline from the Command Palette (Ctrl+Shift+P) by typing "Cline".
* Open the Command Palette (Ctrl+Shift+P) and type "Preferences: Open Settings (JSON)".
* Add your Cline API key to the settings:
```json theme={null}
{
"cline.anthropicApiKey": "your-api-key-here"
}
```
Make sure to replace `your-api-key-here` with your actual API key.
* In VS Code, open Command Palette (Ctrl+Shift+P)
* Type "Cline: Open MCP Settings" to open `cline_mcp_settings.json`
* Add your MCP server configuration:
```json theme={null}
{
"mcpServers": {
"weather-openweather": {
"autoApprove": [
"get_current_weather",
"get_weather_forecast",
"get_weather_by_coordinates"
],
"disabled": false,
"timeout": 30,
"type": "sse",
"url": "http://:3050/sse"
}
}
}
```
Make sure the URL matches the one your MCP server is running on Clouddley.
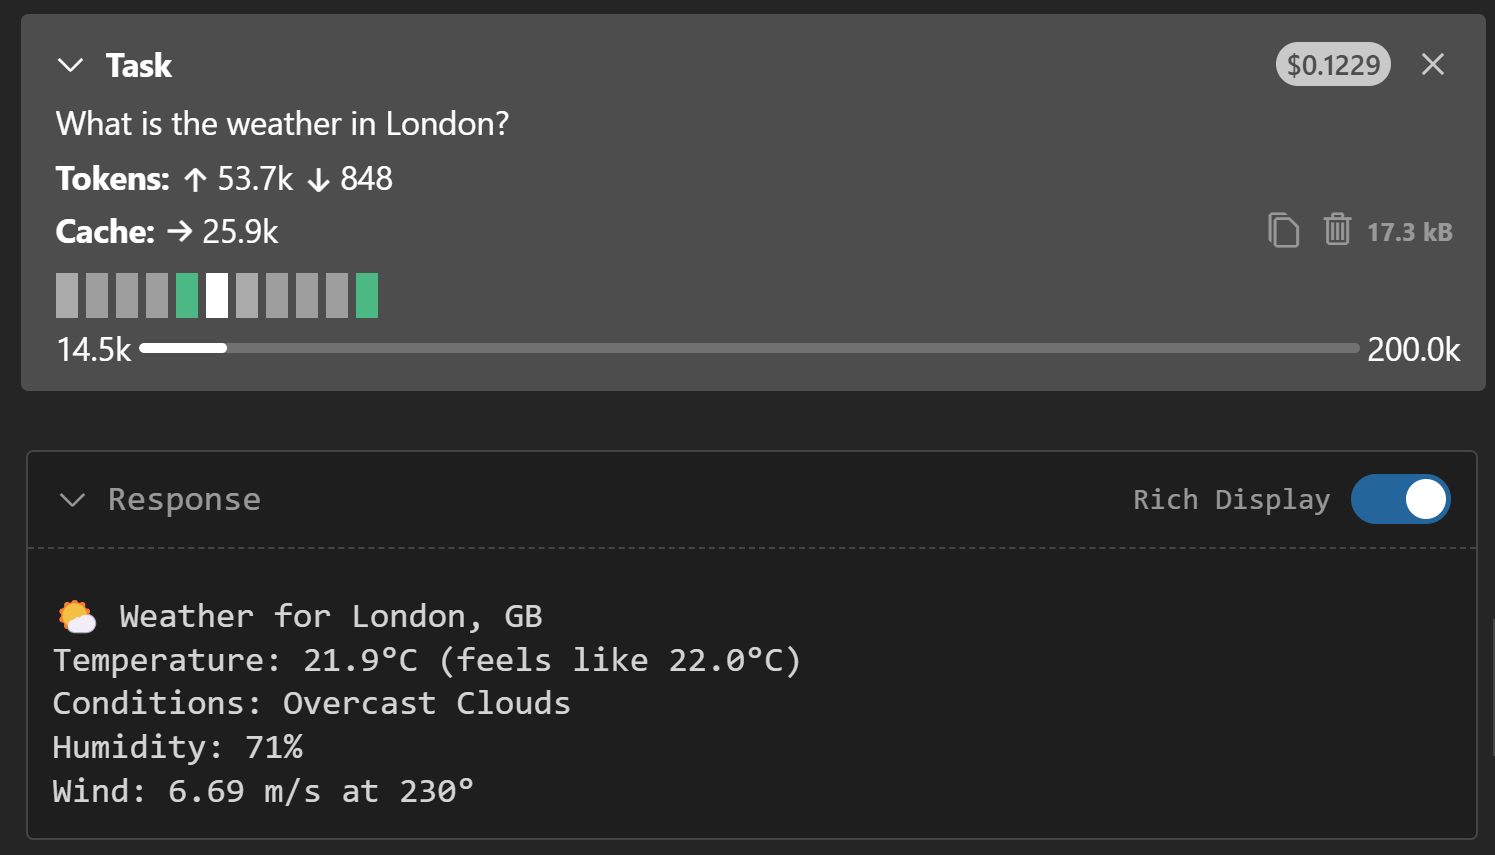
* Open a new task in Cline in VS Code
* Ask: "What is the weather in London?"
* Verify Cline can:
* Connect to your FastAPI weather MCP server
* Make weather API calls
* Return formatted weather data
You should see a response like for the API Call:
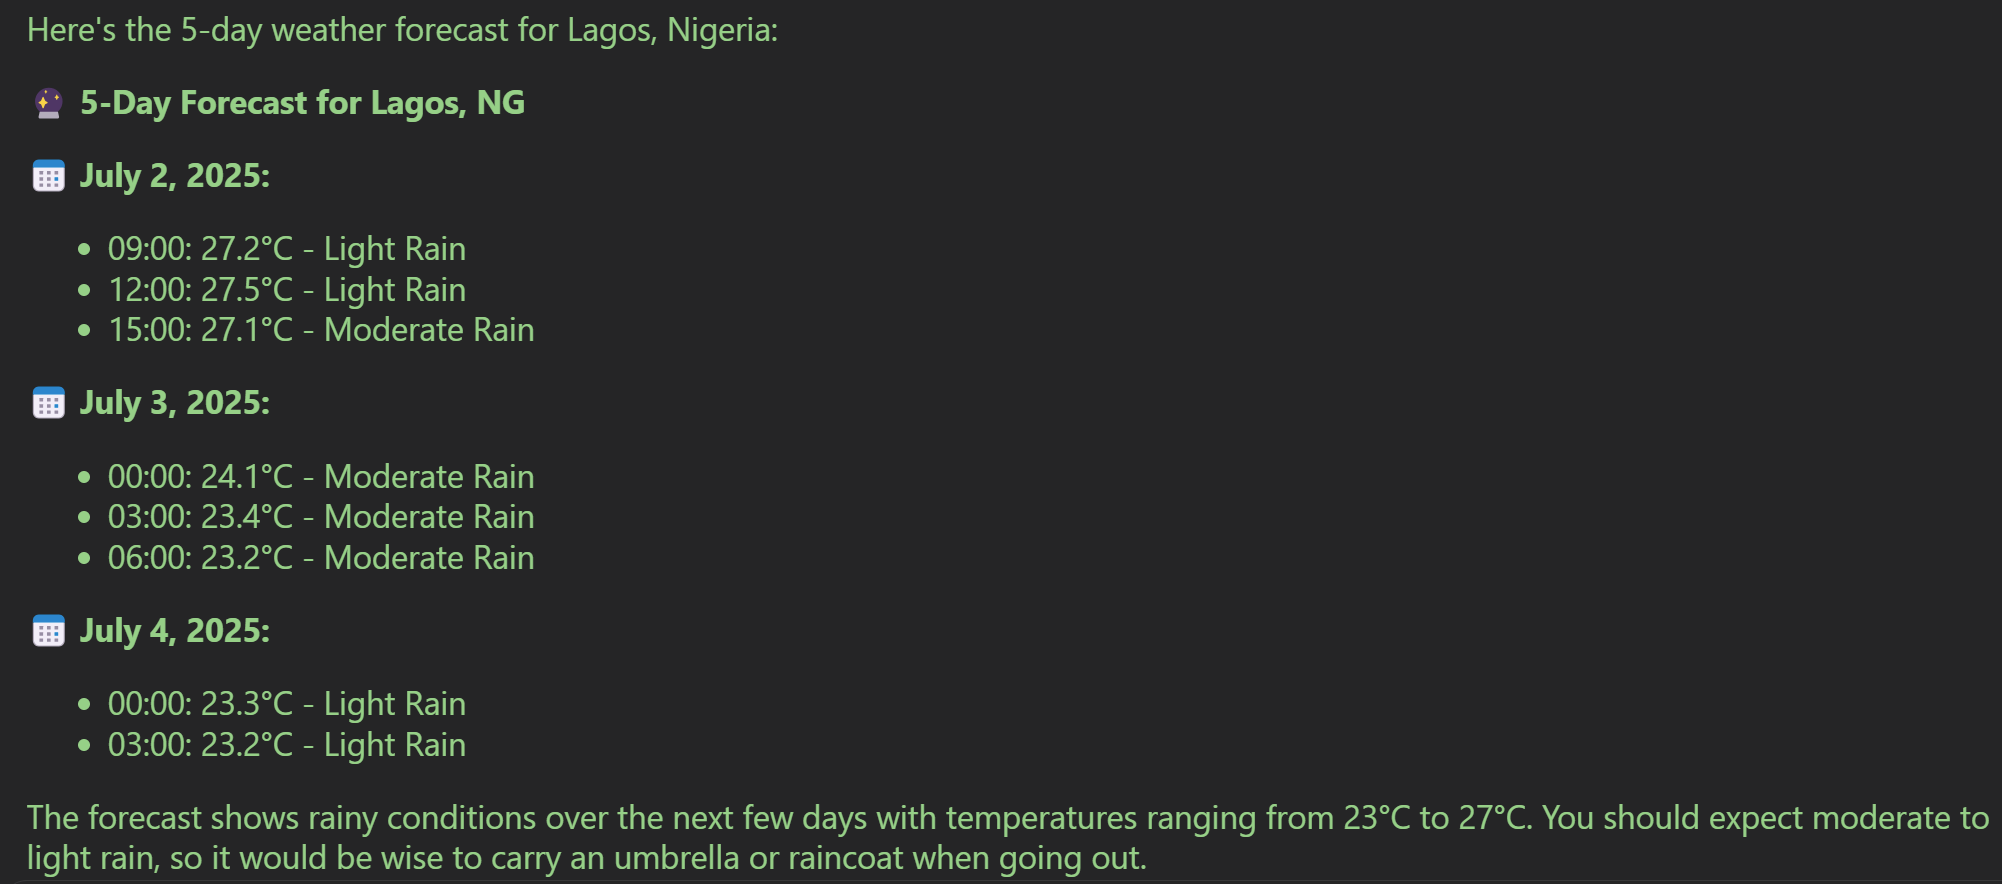
* Ask: "What is the 5-day weather forecast for Lagos?"
* Verify Cline returns a formatted forecast response:
You've successfully set up and tested your FastAPI weather MCP server with Cline. Your server can now handle MCP requests and return weather data through the Model Context Protocol.
## Conclusion
You’ve created a weather alert MCP server and deployed it on a virtual machine using Clouddley, connecting real-time weather data with AI assistance. Your server demonstrates how to integrate external APIs with the Model Context Protocol, giving Cline access to current weather conditions and enabling users to ask detailed questions about forecasts.
This approach works beyond weather data. Apply the same pattern to build MCP servers for any external data source your applications need.
Continue developing MCP servers that connect AI with real-world data to solve practical problems.
A backend infrastructure for your own compute. Run apps, databases, brokers, and AI workloads on your VMs, bare metal, or VPS.
## References
* [FastAPI Official Documentation](https://fastapi.tiangolo.com/)
* [Model Context Protocol Specification](https://modelcontextprotocol.io/)
* [Cline Documentation](https://docs.cline.bot/getting-started/for-new-coders)
* [OpenWeatherMap API Documentation](https://openweathermap.org/api)
* [Clouddley Documentation](https://docs.clouddley.com/)
* [Python Environment Management Best Practices](https://docs.python.org/3/tutorial/venv.html)




 Your app is now deployed and running on your Virtual machine. You can access it using the IP address and port you specified during setup. i.e `http://